In this tutorial, we will look at how to set up Tailscale on Docker.
Tailscale is a zero-configuration VPN, which means that without any port forwarding, you’ll be able to access all the devices on your local network. Running Tailscale on Docker is a great option as you can configure the container, connect it to your Tailscale account, then access your local network.
Tailscale is a great option for really anyone, though there are some users who have a CGNAT where using Tailscale is necessary for VPN connectivity.
How to Set Up Tailscale on Docker
We will look at how to set up Tailscale on Docker below, but make sure that you have Docker installed first. This tutorial will show how to install Docker and Portainer, but you can ignore the Portainer section for this tutorial (unless you want to install it).
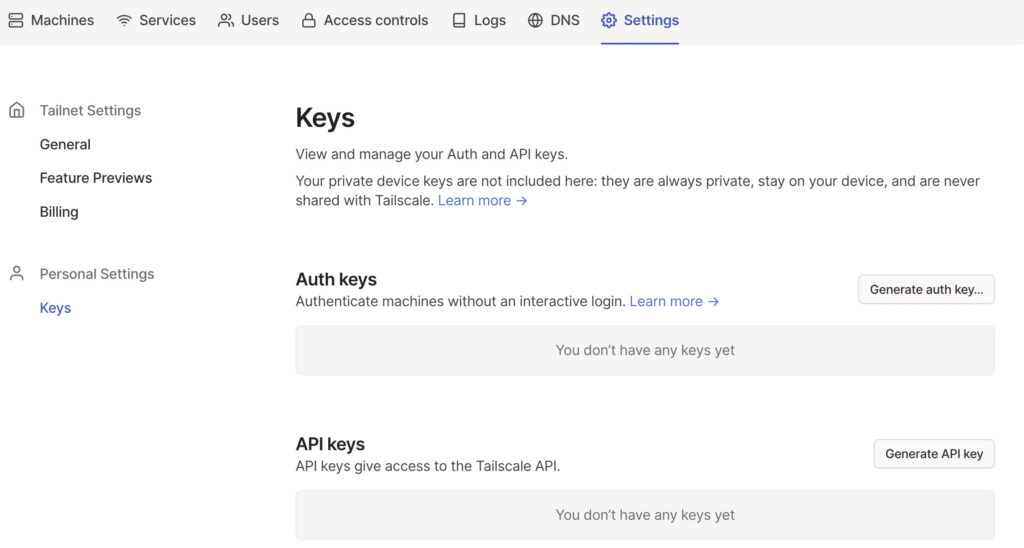
1. Before we proceed, we need to configure the pre-authentication key. This can be created on the Tailscale website. If you don’t already have an account, create one, then log in and select Settings, then Keys.

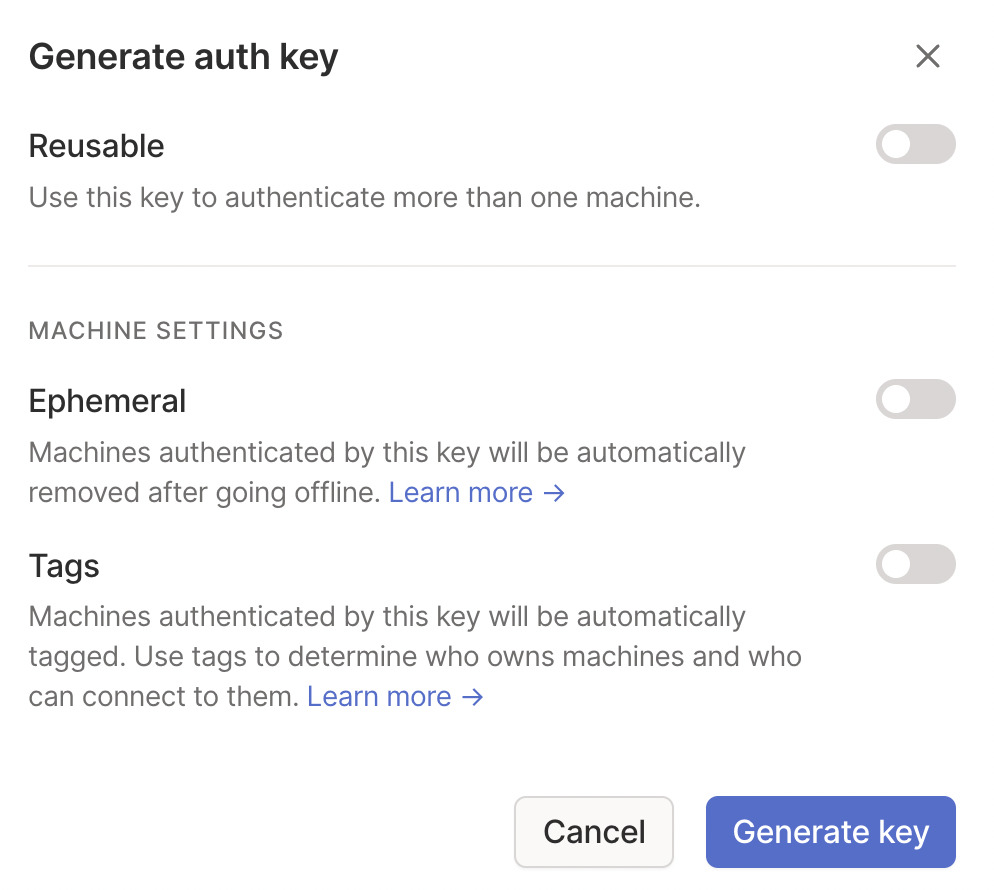
2. Select generate auth key so that we can create the key for Docker. Select Generate Key (the settings can stay as default).
If you want the key to be reusable (which most do), make sure you select Reusable.

3. After the key has been generated, copy it, then proceed to the docker configuration.

4. Open the terminal on the device where you’re running Docker (or SSH into it), then run the command below. Please note that you will have to add your TS Auth Key that we created above.
NOTE: There are two different commands you can run here. The first will not advertise routes, and the second will (as well as advertise an exit node). When you advertise a route, you’re allowing other devices on your local network to be accessed through Tailscale.
4.1. If you only want to access the device you’re installing Tailscale on, run the command below.
sudo docker run -d --name=tailscaled -v /var/lib:/var/lib -v /dev/net/tun:/dev/net/tun --network=host --cap-add=NET_ADMIN --restart unless-stopped --cap-add=NET_RAW --env TS_AUTHKEY=[AUTH KEY] --env TS_STATE_DIR=/var/lib/tailscale tailscale/tailscale
4.2. If you want to access all devices on your local subnet, run the command below substituting the Auth Key and the Subnet. In my case, the subnet is 10.2.0.0/24, though your subnet is most likely different.
Please note that there are also other environment variables you can use if desired.
sudo docker run -d --name=tailscaled -v /var/lib:/var/lib -v /dev/net/tun:/dev/net/tun --network=host --cap-add=NET_ADMIN --restart unless-stopped --cap-add=NET_RAW --env TS_AUTHKEY=[AUTH KEY] --env TS_EXTRA_ARGS=--advertise-exit-node --env TS_ROUTES=[SUBNET] --env TS_STATE_DIR=/var/lib/tailscale tailscale/tailscale
5. After running the command above, the container should pull and install. At this point, the actual Tailscale configuration is complete.

6. If you log in to the Tailscale website, you should see the device that you configured appearing in your account.

If you used the TS_ROUTES environment variable above, you should also see a small subnets icon (though a few additional configuration steps are required).

Exit Node/Subnet Routes
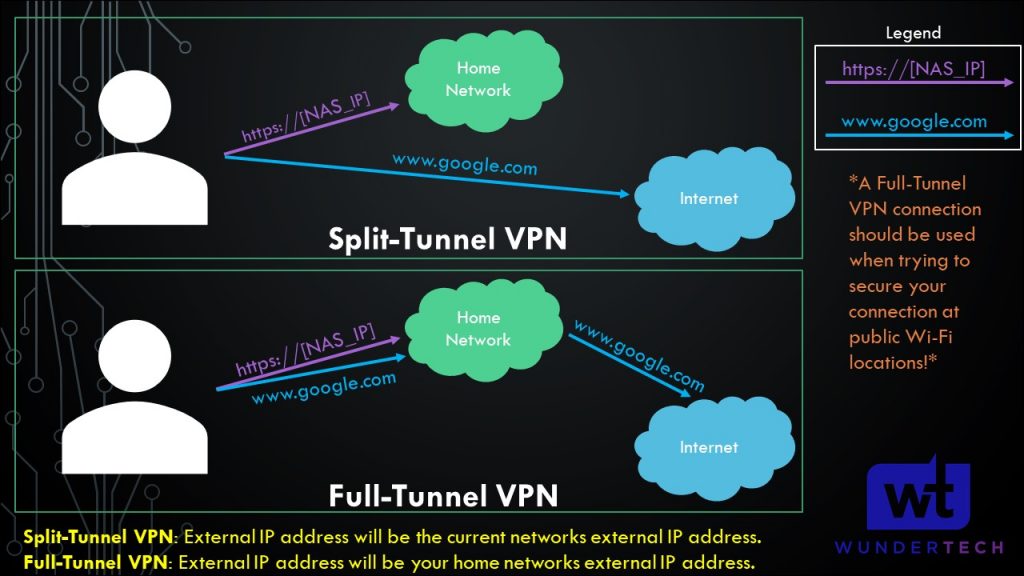
If you set up Tailscale as an Exit Node (or simply access the local subnet), there are additional settings that must be configured. If you configure an Exit Node, it can be used as a full-tunnel VPN.
The image below shows what a full-tunnel vs split-tunnel VPN is, but the important point is that all traffic will be routed through Tailscale if you use an exit node.
Therefore, if you’re on public Wi-Fi, it’s probably a good idea to use this feature as you’ll be tunneling all traffic through the Tailscale tunnel (thus, securing the connection).

A few things must be configured to set up subnet access (split-tunnel) or an exit node (full tunnel) in Tailscale:
1. On the Tailscale website, select Machines, then the three ellipses next to your Docker system, then Edit Route Settings.

3. If you want to use a full-tunnel VPN, select the subnet route and use as exit node. This will configure a full-tunnel VPN.
If you only want to use a split-tunnel VPN (meaning only being able to access the 10.2.0.0/24 subnet in the screenshot below), select that option, but do not select the “use as exit node” option.

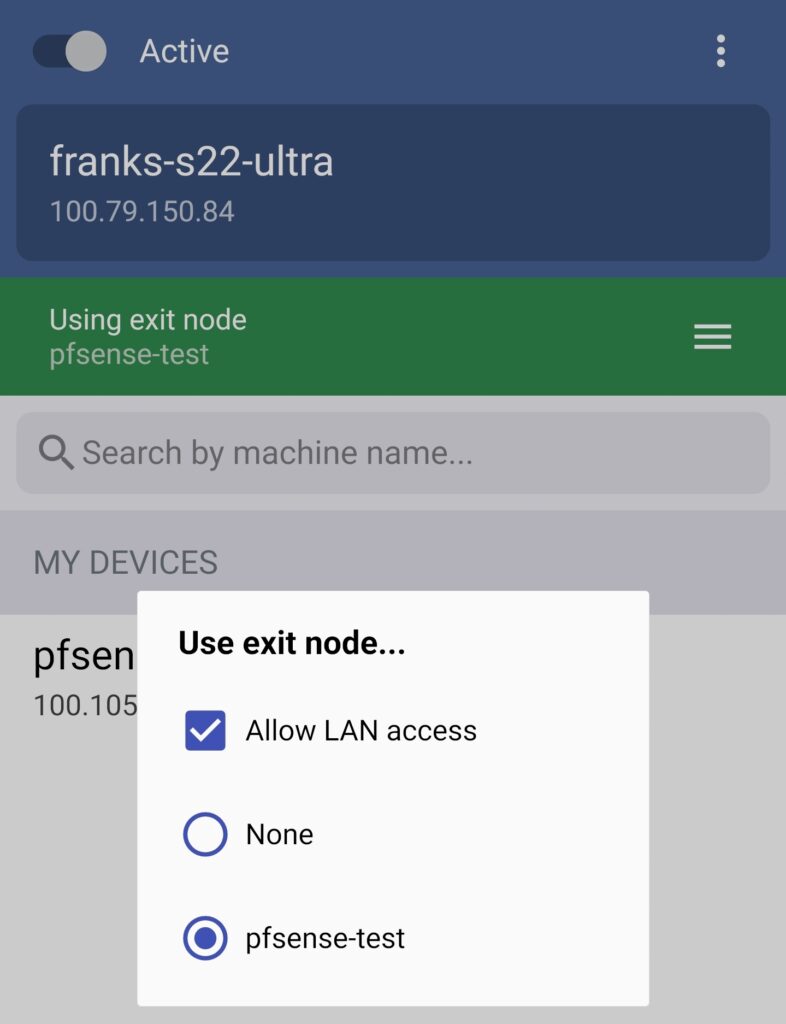
4. If you do want to use an exit node, select Use Exit Node (on whatever application you’re using) and change the exit node to be the Docker machine.
If you do not want to use the exit node, select None, but ensure that Allow LAN Access is enabled so that you’re able to connect to your local devices.
NOTE: The screenshot below uses pfSense, but it’ll be the same for your Docker configuration.

5. Tailscale is now configured! You can now add other devices or simply connect to Tailscale from an external network to access all of your local devices.
Conclusion & Final Thoughts
This tutorial looked at how to set up Tailscale on Docker. Tailscale couldn’t possibly be easier to set up and it’s (in my opinion) the easiest and fastest way of setting up a VPN server on almost any device.
It is important to note that this isn’t a traditional VPN the way that OpenVPN or WireGuard is (which can be run on routers like pfSense or OPNsense), but it’s the fastest way to access your local network and doesn’t require any port forwarding.
Thanks for checking out the tutorial on how to set up Tailscale on Docker. If you have any questions on how to set up Tailscale on Docker, please leave them in the comments!


