In this article, we’re going to look at how to set up TrueNAS Community Edition (formerly TrueNAS Scale, but rebranded in the 25.04 update, meaning TrueNAS Core vs Scale is not much of a debate anymore).
There are many steps involved to ensure that you configure TrueNAS properly, and configuring a pool, datasets, snapshots, backups, and more can be confusing for beginners. I’ve used TrueNAS for years (from Core, to Scale, to now Community Edition), and this article will focus on the best setup for beginners.
Video on How to Set Up TrueNAS Community Edition
Watch our step-by-step video tutorial on how to configure TrueNAS Community Edition. We’ve embedded our full YouTube walkthrough below, which goes over the entire process.
How to Set Up TrueNAS Scale (Community Edition)
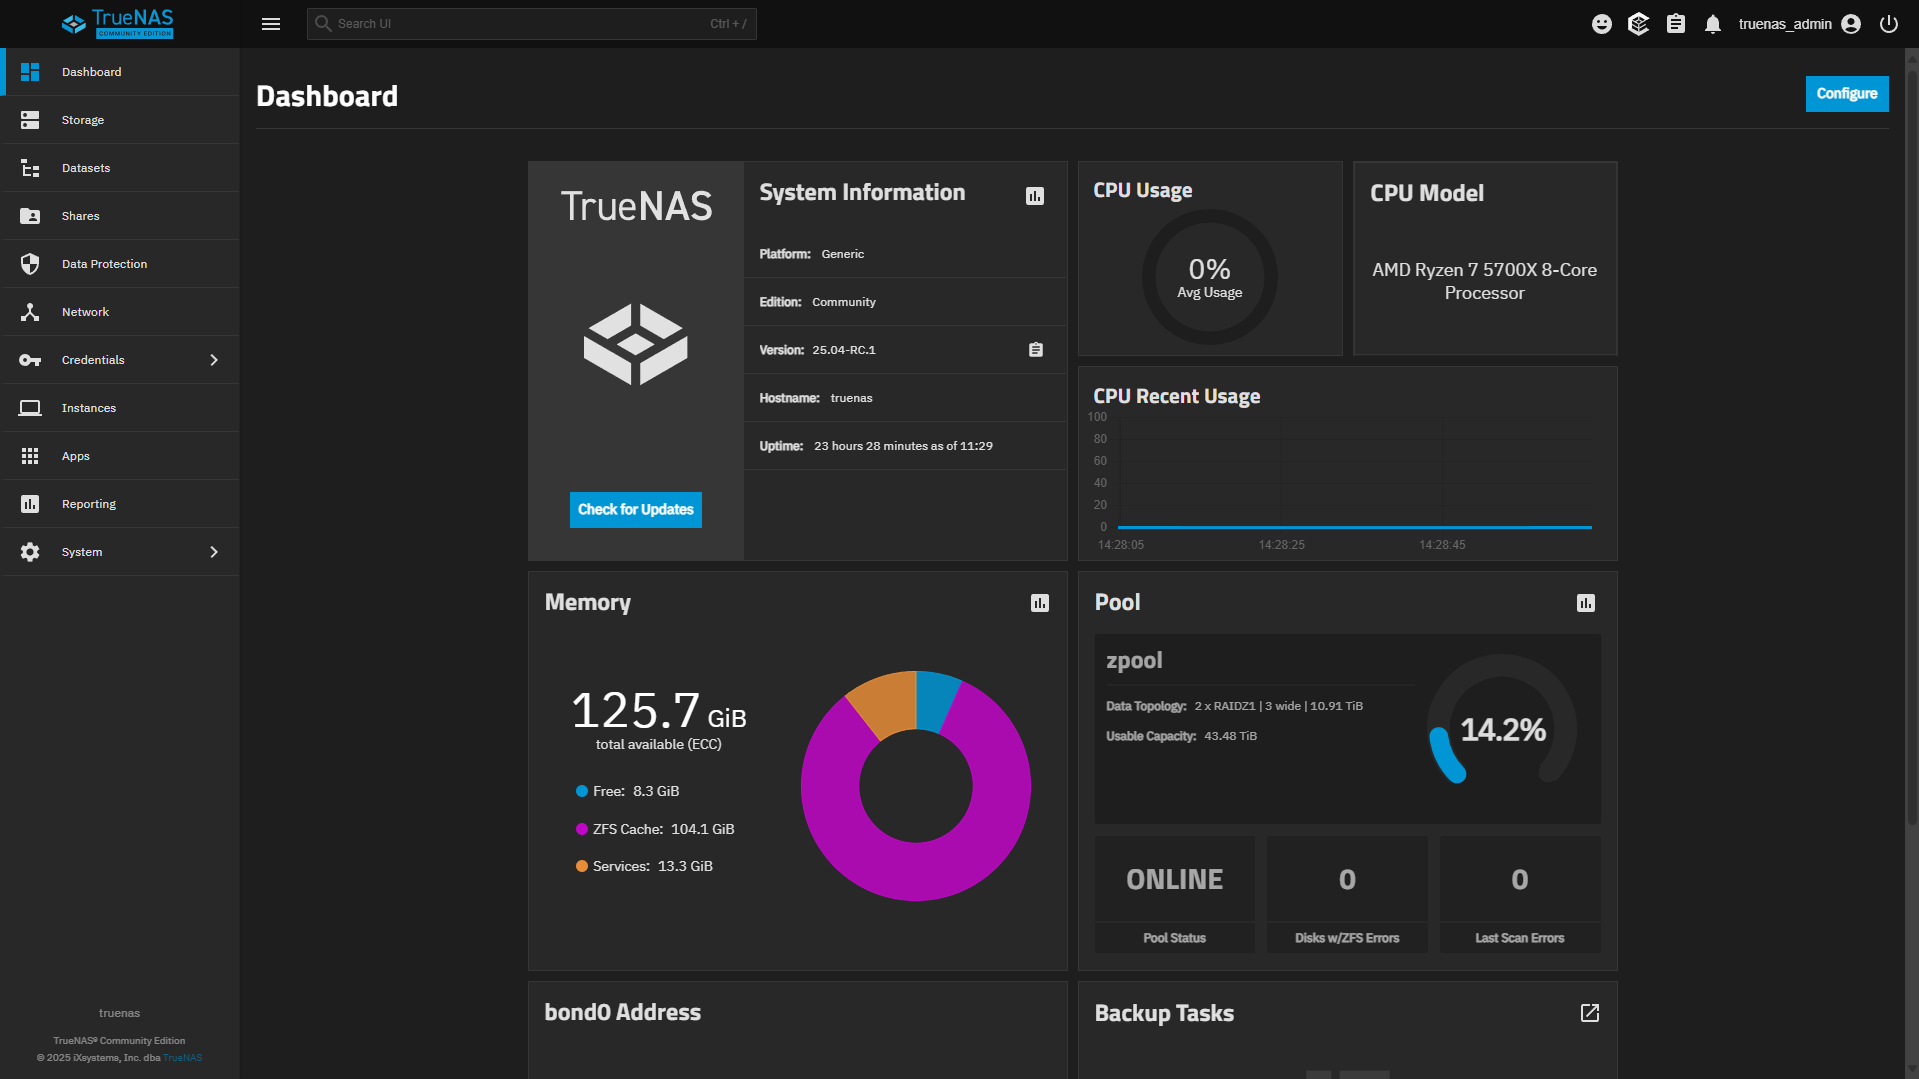
At this point, you should have installed TrueNAS on your NAS and can access the Web UI. We will be focusing on setting up TrueNAS and the best settings to use.
Selecting a ZFS Pool Layout
This is the most important, but misunderstood topic on setting up TrueNAS in this tutorial. The pool type you decide to use (stripe, mirror, RAIDz1, RAIDz2, RAIDz3) will ultimately determine your experience with TrueNAS. This will impact everything, from performance to resilver times, and is often compared to traditional RAID (RAID 1/ 5 / 6)…but the only thing they really share in common is the total number of drives that can be lost without losing data (redundancy).
This is often misunderstood because with ZFS, you create a vdev, which has a specific layout (stripe, mirror, RAIDz1, RAIDz2, RAIDz3). However, vdevs can be striped together, and this is where things can get a little confusing, so let’s look at some of these impacts before configuring our pool.
ZFS Pool Performance
With traditional RAID, you have one RAID array and continue to add disks to that RAID array. Many people feel that’s the best thing to do with ZFS as well, but that’s not necessarily the case. Due to the parity calculations with ZFS, pools can end up being very slow in comparison to traditional RAID arrays with the same number of disks. This is an example chart highlighting the performance you can expect to see (estimated) based on the pool layout you use.
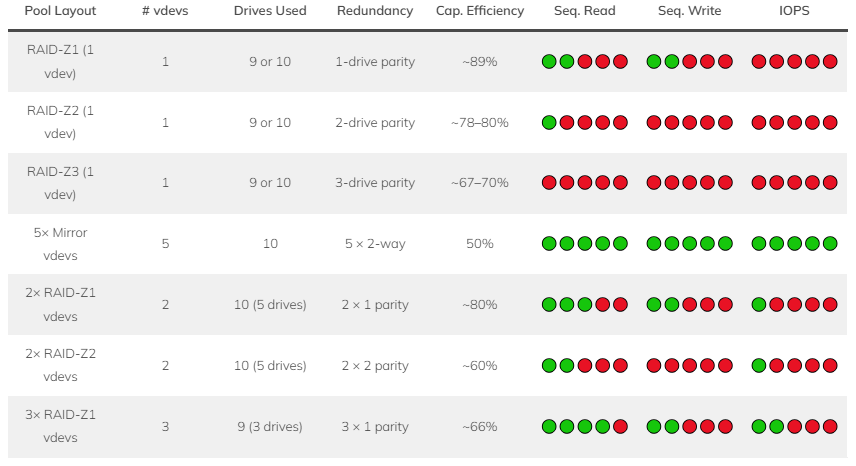
As you can see from the chart above, generally, the lower the capacity efficiency (meaning the total storage space you’ll have based on the drives you have in the pool), the slower the performance. The lower that number, the better the performance you’ll see across your pool. This is because more vdevs will be striped together.
Resilvering of a Failed Drive
When you’re using RAIDz1, RAIDz2, or RAIDz3, parity calculations are used, but with mirrors, they’re not. The layout you select impacts the performance of your ZFS Pool, but it also impacts the resilvering process. Resilvering is what occurs when a drive fails and the pool has to rebuild a new drive.
Using 10TB drives where one disk fails and the pool is roughly ~50% full, these are the estimated times it would take to resilver a drive.
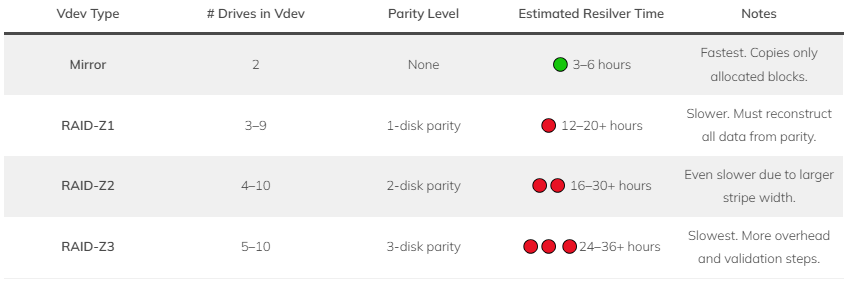
As you can see, mirrors are the fastest, but does that immediately make mirrors the best layout you can use when setting up TrueNAS? Well, it depends. They will technically give you the best performance if you have multiple and the fastest resilver time, but you’ll only get 50% of the available storage space. This makes the decision tougher,
Another important thing to take into consideration when setting up TrueNAS is adding new drives. While your ZFS pool can be extended since v24.10, if you use multiple vdevs, to expand the pool, you need to add a new vdev. In the example above, a mirror would mean two drives, but a RAIDz1 vdev might mean three or more drives. Always take this into consideration as well.
Creating a ZFS Pool
Now that we understand the performance and resilvering that you can expect based on the type of vdev(s) you’d like to create, we’ll look at creating a ZFS pool.
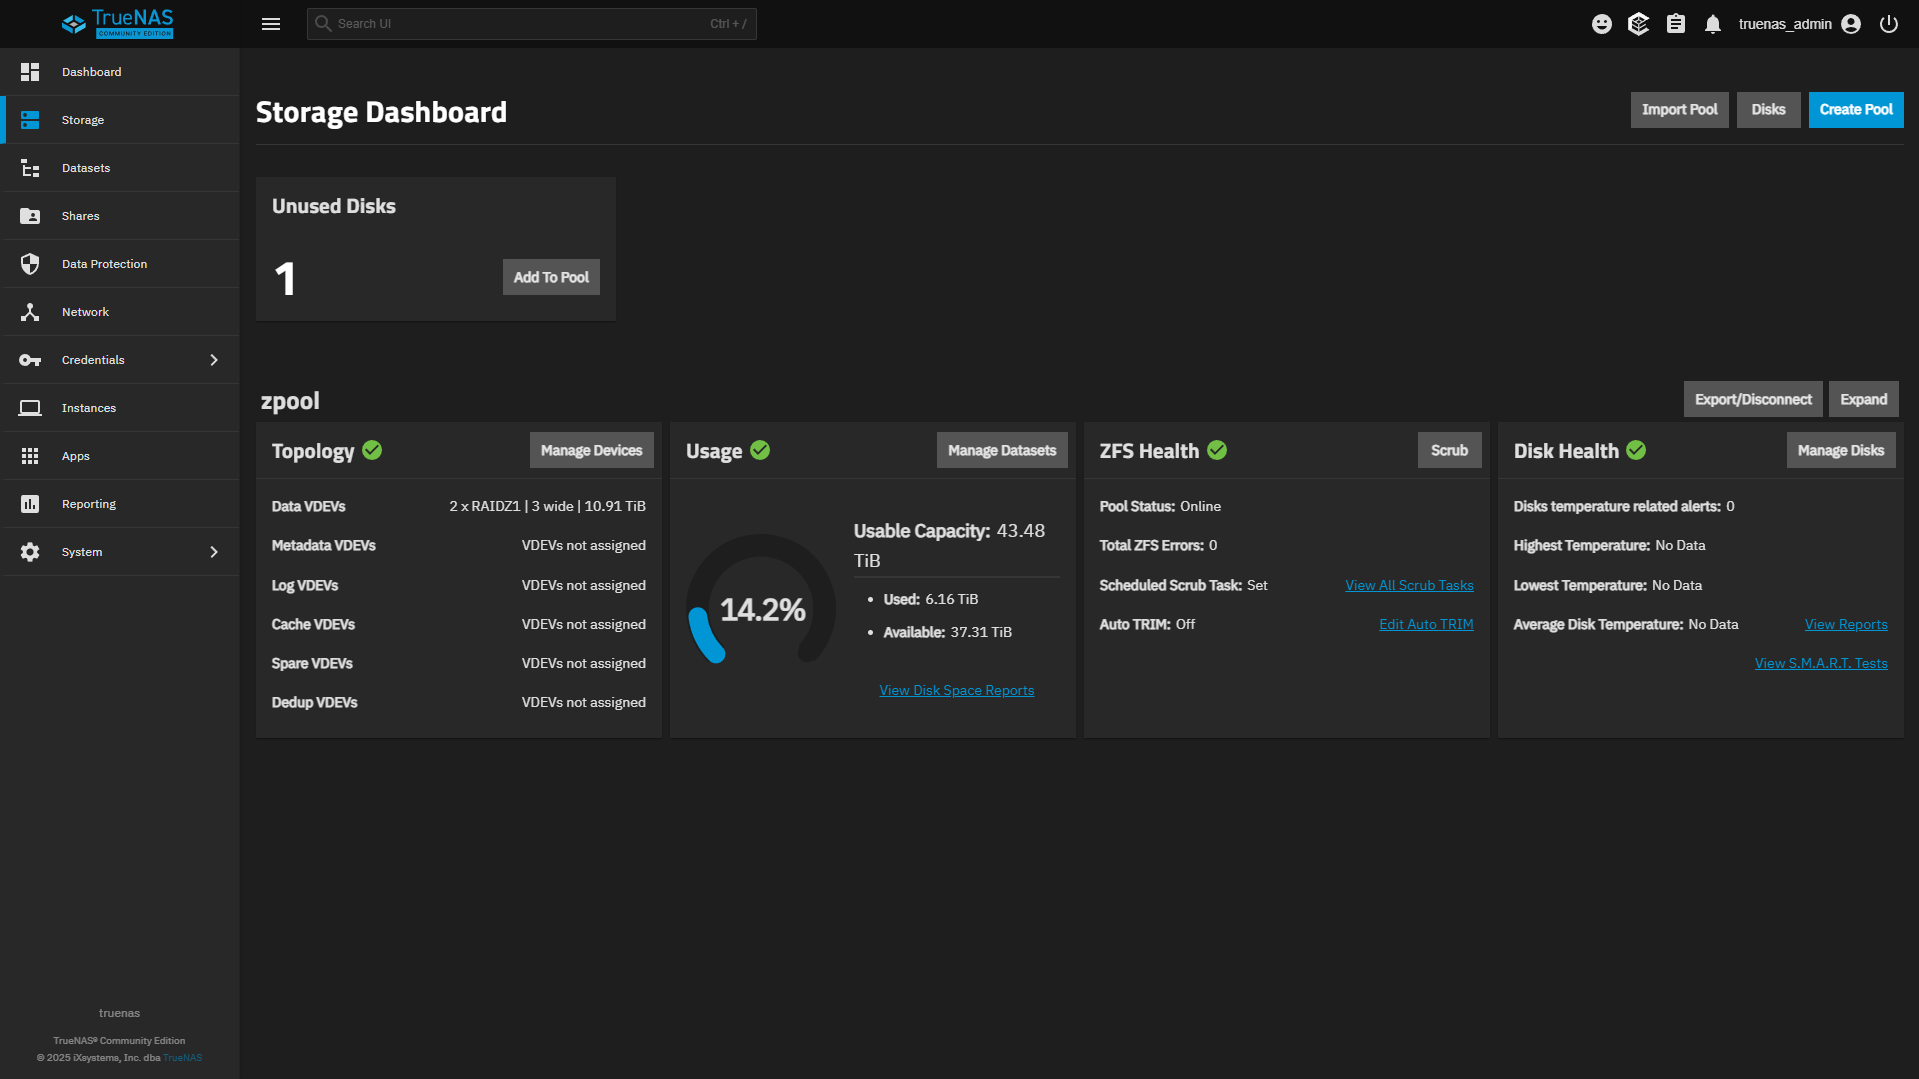
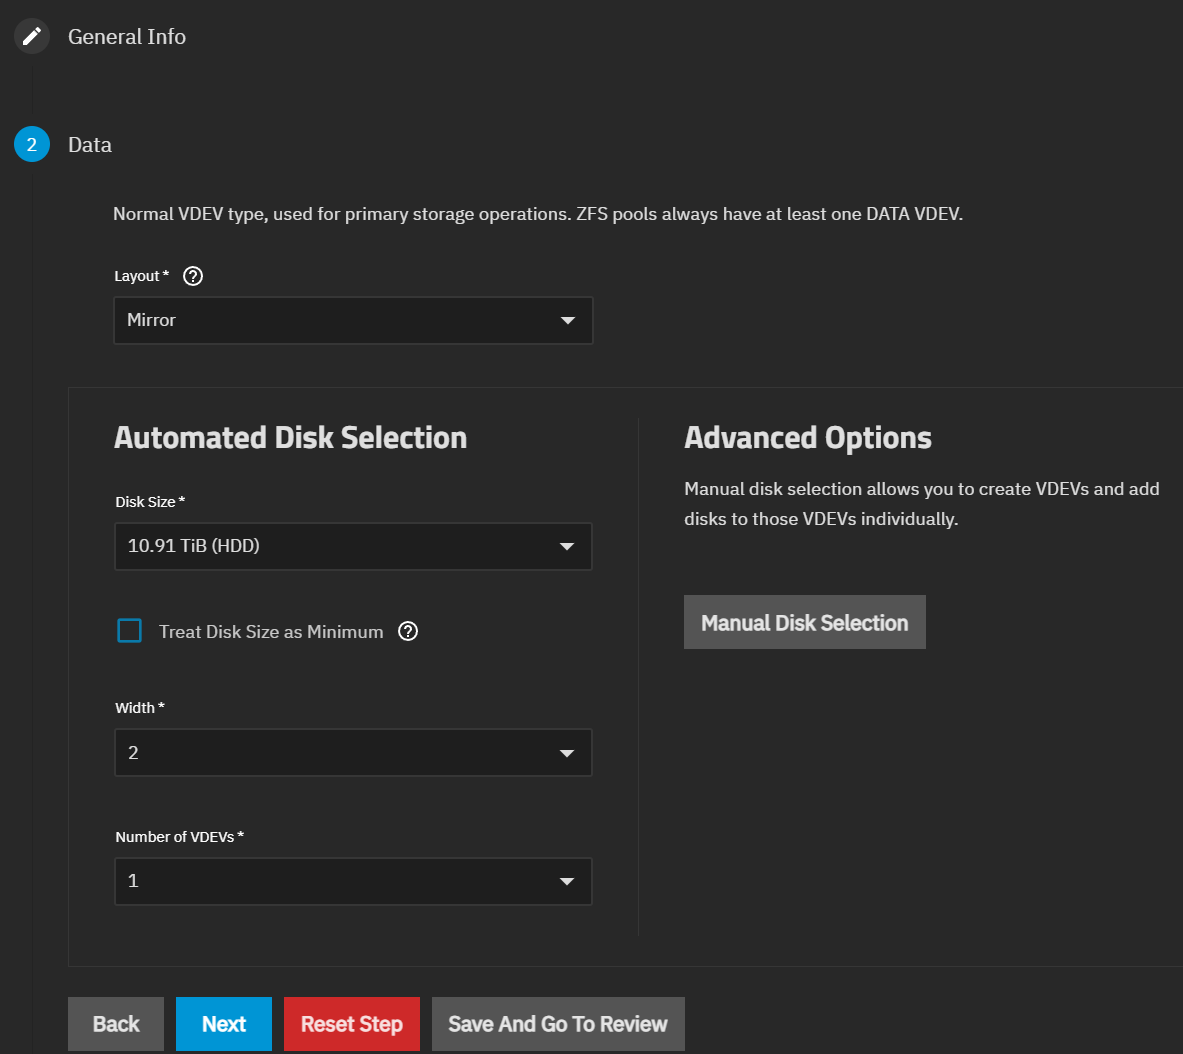
1. Select Storage > Create Pool.

2. Give the ZFS pool a name and enable or disable Encryption (depending on if you want to use it.
3. In the Layout section, select what you’d like to use, the disk size, the width, and the number of vdevs (if you want multiple). For beginners, all other settings can stay as default. While they can improve the read/write performance of the pool, they’re advanced features that you shouldn’t start with (hint, just add more RAM for now, but we’ll talk about that later).
Creating a Dataset
Datasets are where your data is stored when setting up TrueNAS. They’re part of your pool, and datasets can be at the highest level (right under the pool dataset) or nested (under a separate dataset). The main reason you would nest datasets is to have similar datatypes consolidated under a category (example, media dataset with TV shows, movies, etc, under it), and you want different backup/snapshot schedules or different permissions.
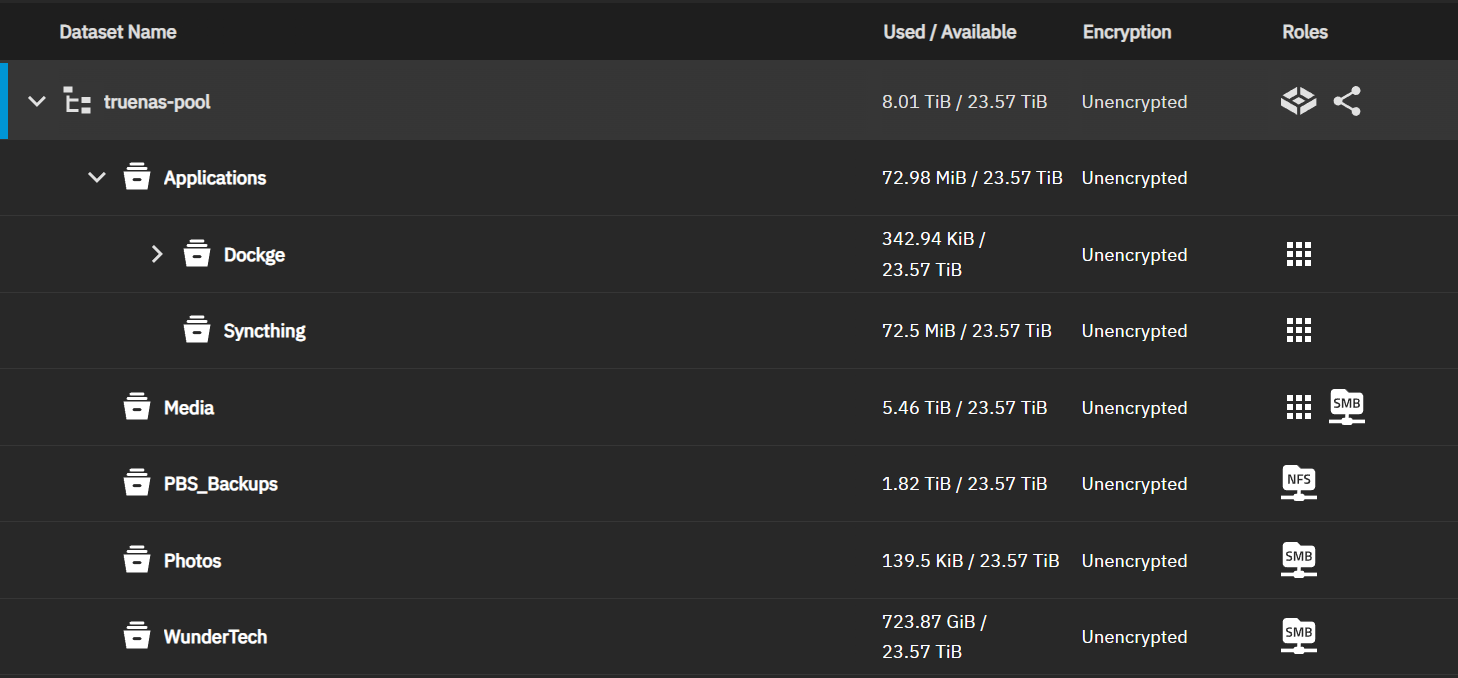
There isn’t necessarily a right or wrong way to do this, so the best way to handle it is to determine your backup, snapshot, and permission settings up front. If they’re different, you are going to want different datasets – it’s just going to be a question of whether they’re nested or not. To create a dataset, follow the steps below:
1. Select Datasets > Add Dataset.
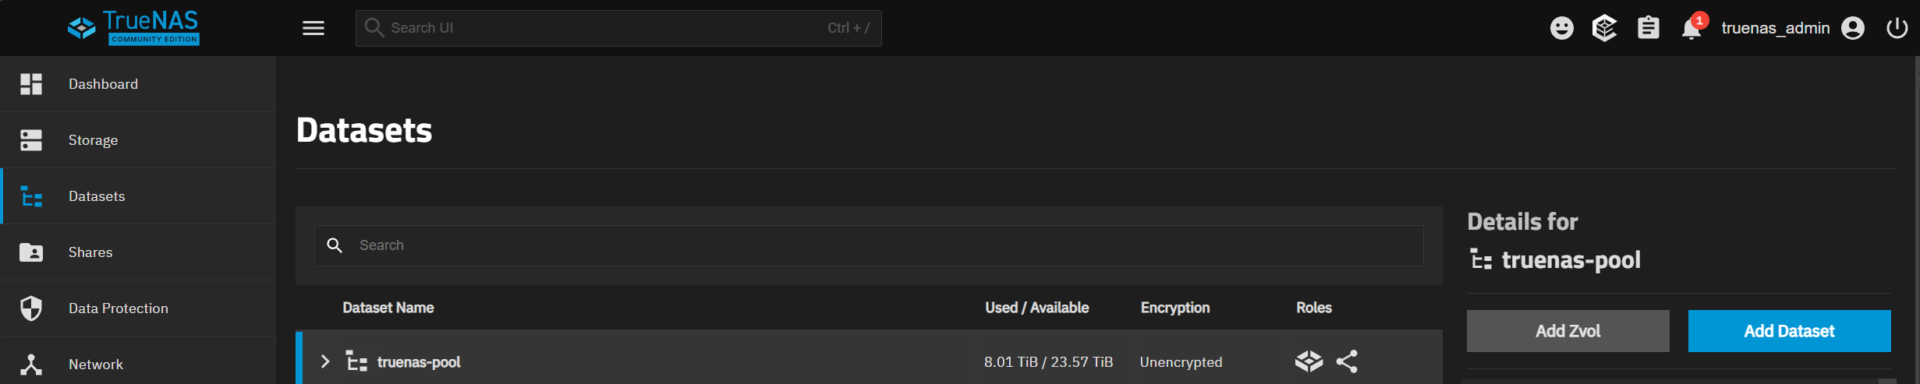
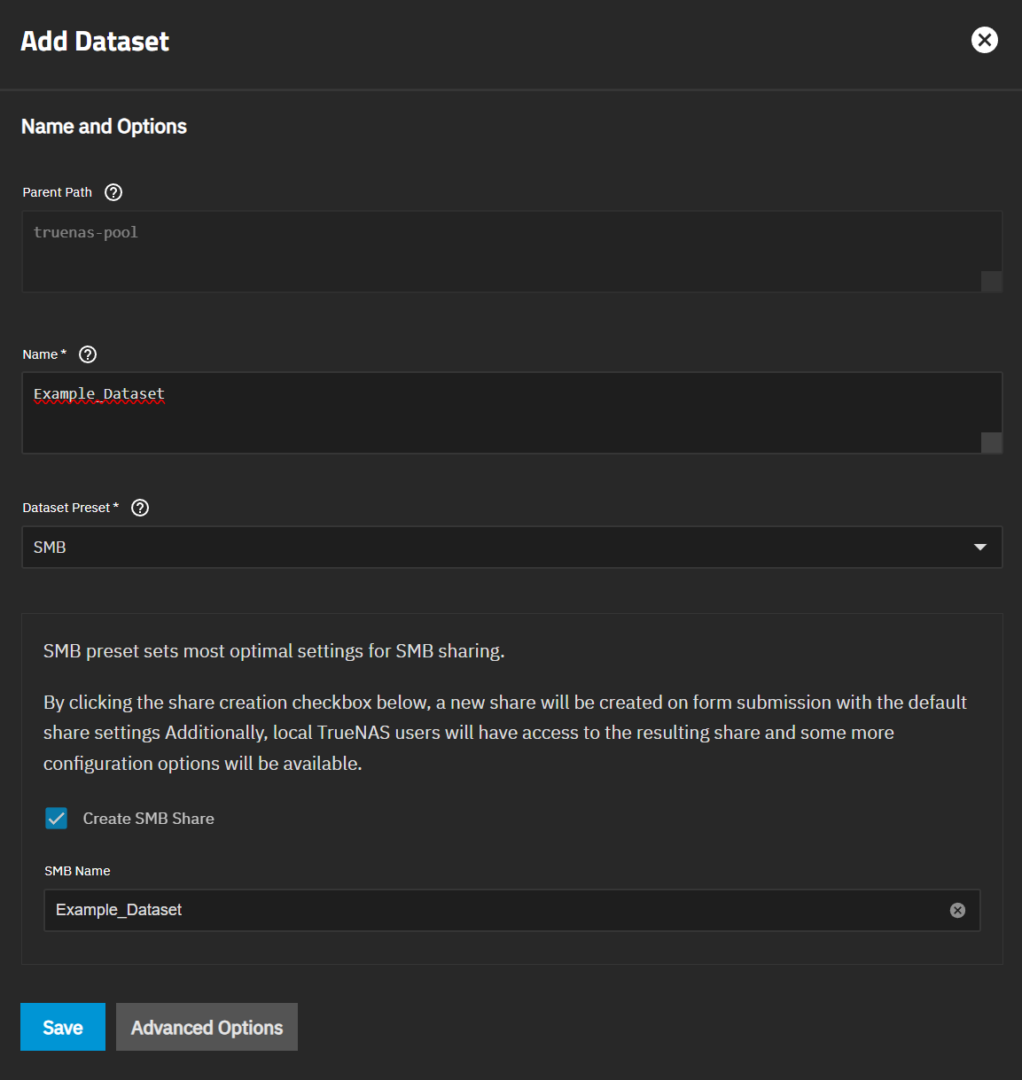
2. Give your dataset a name, and then in the dataset preset, select the type of dataset you’ll be using. This is very important for permissions, and while they can change at a later time, it is the absolute easiest time to do it.
- Generic: Default UNIX Permissions
- SMB: Used for SMB shares (ACLs)
- Apps: Designed for use with apps (Docker Containers)
- Multiprotocol: Designed for NFS and SMB
Depending on the option you select, there might be additional settings to fill out (like the SMB name), but after you save, this dataset can be used!
Data Protection Settings: TrueNAS Setup Process
Now that our pool and datasets are created, we can continue setting up TrueNAS by configuring data protection. This is what we’ll use for our snapshots, scrub tasks, and more.
Scrub Tasks
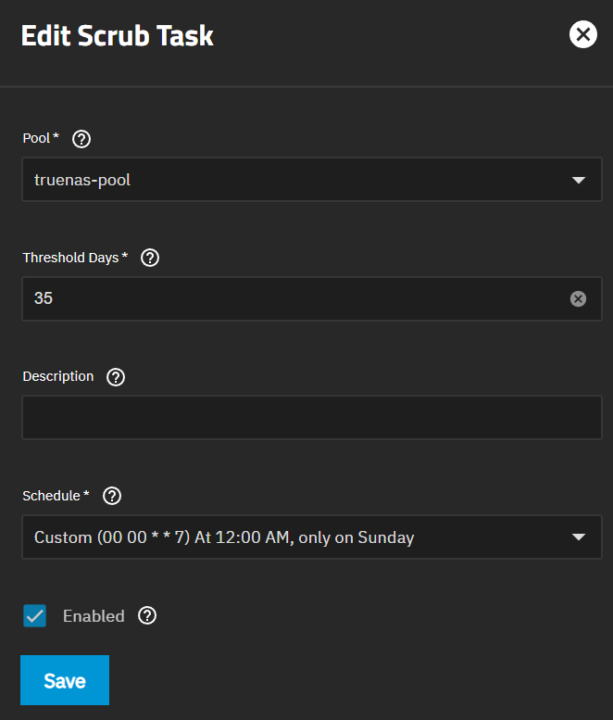
A scrub task is a maintenance step that checks the integrity of your data. It scans through your pool(s), and detects and corrects any silent corruption that might occur. This is configured by default, but you can modify the times it runs if you’d like, but I tend to keep the default settings, which I think make the most sense.
By default, the scrub task will run every week on Sundays, but since the threshold is set to 35 days, it will not run until the threshold is met, so by default, every five weeks. You can modify the schedule or threshold if you’d like.
Periodic S.M.A.R.T Tests
S.M.A.R.T tests are designed to check the disks in your pool. You can run long or short tests, and if a drive has any issues, you’ll be notified.
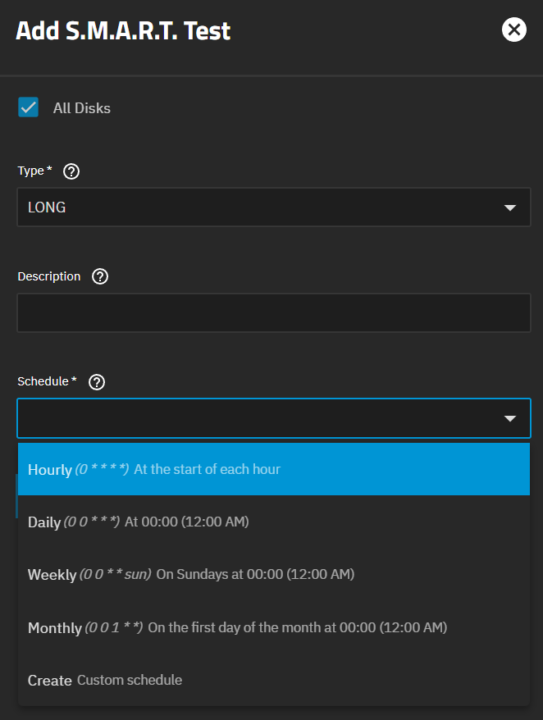
I like to schedule quarterly long tests (though many prefer monthly) and weekly short tests. This ensures that the drives are checked regularly.
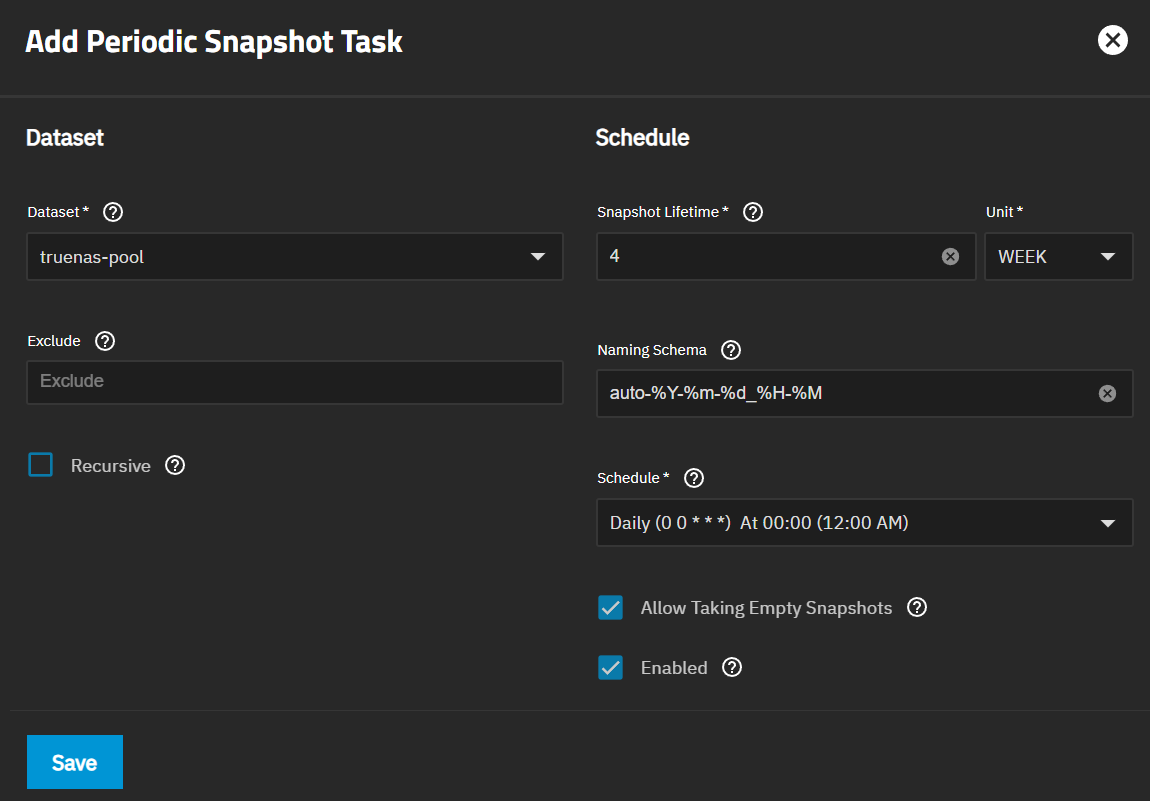
Snapshot Tasks
Snapshots are incredibly important to run and are one of the biggest benefits of ZFS. Snapshots freeze data at a point in time, and TrueNAS makes it very easy to configure snapshots as they can be configured on the entire pool. With that said, as we discussed earlier, each dataset can have a different snapshot schedule if you’d like, and this is where you can use nested datasets to ensure different snapshot or backup schedules are created.
You can customize any of the settings you’d like below, but in general, I’d suggest daily snapshots with a two-week lifetime (at minimum).
Backups
The final thing I’d suggest for setting up TrueNAS is backups. This will be dependent on where you want to back up your data, but you can use the TrueCloud Backup with Storj, rsync, or even a Cloud Sync task. The only disclaimer with a Cloud Sync task is it’s not a backup, it’s a sync, and for that reason, you should make sure the destination has some sort of snapshot or version feature to protect against things like ransomware attacks.
Final Thoughts on TrueNAS Setup Process
TrueNAS is an awesome NAS operating system, but a lot of people are confused by it. Overall, I think it comes down to some of the nuances (like ACLs) which make it different than other NAS operating systems, but once you get used to it, it can’t be beat, and in my opinion, is the best DIY NAS Operating System you can use. Thanks for checking out the article on setting up TrueNAS!