How to Install AdGuard Home on a Synology NAS

  • Post author:WunderTech
  • Post published:September 3, 2020
  • Post last modified:October 30, 2023
  • Post category:Synology
  • Reading time:16 mins read
  • Post comments:87 Comments

Today we are going to look at how to install AdGuard Home on a Synology NAS.

AdGuard Home is a network-wide ad-blocker and a competitor to Pi-hole. I have a few tutorials on how you can setup Pi-hole on a Raspberry Pi and Synology NAS, but this tutorial will focus on installing AdGuard Home on a Synology NAS.

How to Install AdGuard Home on a Synology NAS

We will look at how to install AdGuard Home on a Synology NAS below.

Should you use AdGuard Home or Pi-hole?

The first and logical question will be “which is better?”, as both AdGuard Home and Pi-hole are network-wide ad blockers. This is a completely subjective question and I’d be wary of anyone who tells you one is better than the other.

If you look at the AdGuard Home website, you’d believe that AdGuard Home is the clear winner, but after further inspection, Pi-Hole is a lot closer than it might first appear.

So here’s my completely subjective answer as someone who has used Pi-hole for a long time: I like Pi-hole and will continue to use it, but if I was interested in setting up encrypted DNS (DNS-over-HTTPS), I’d probably spring for AdGuard Home.

You can set up DNS-over-HTTPS on Pi-hole as well, but it isn’t nearly as simple. Whether this is necessary can be debated, but in my opinion, it’s a lot easier to set up on AdGuard Home.

Docker Folder Settings

1. Install Docker from Synology’s Package Center.

2. We need to create two folders that we will map our Docker image to. By default, Docker will create a folder named docker after it’s finished installing. Inside of this folder, we are going to create a folder named adguard. Inside of that folder, we are going to create two subfolders. Create one folder named conf and another folder named data.

adguard folders in dsm

Before we proceed, there are two different ways to set this up. The first is using your host network device, which means that all traffic will be sent to the IP address of your NAS. The second is by creating a macvlan network interface in Docker.

I prefer creating a macvlan network interface because it sets a separate IP address for the DNS server and avoids port conflicts. If you use the host network interface, you will need to use your NAS’s IP address as your DNS server.

You also might run into conflicts with existing services using this method, so I will not be going over it in this tutorial. However, you’d pretty much skip all of the networking steps and check the “use the same network as Docker Host” checkbox when configuring the network interface.

Installing AdGuard Home on a Synology NAS

1. Ensure you can SSH into your Synology NAS.

Open Control Panel, select Terminal & SNMP, and Enable SSH service. If you are using Synology’s Firewall, ensure that you allow port 22 traffic. I created a video on how to SSH into your Synology NAS if you have any problems.

2. SSH into your Synology NAS using your favorite SSH tool.

3. We need to create a Docker macvlan network interface. First, we need to determine what network interfaces currently exist (on your Synology NAS) and note down the adapter name.

To do this, run the command below and note down the network interface name that has your Synology NAS’s IP address (in this example, mine is eth0).

ifconfig
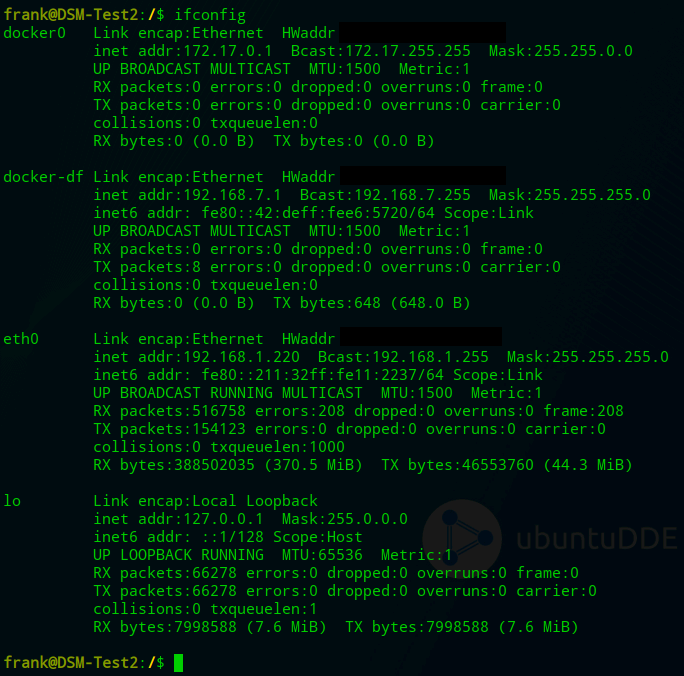
ip addresses for synology nas running ifconfig command

4. Next, you need to run the command below while substituting the correct subnet (most are 192.168.1.0/24 or 192.168.0.0/24 by default).

You also need to pick an IP address that you’d like to use that’s not currently in use. I will be using 192.168.1.198. NOTE: ag_network will be the name of the network (you can substitute this as you’d like).

sudo docker network create -d macvlan -o parent=eth0 --subnet=192.168.1.0/24 --gateway=192.168.1.1 --ip-range=192.168.1.198/32 ag_network
creating maclan network interface using a command

Our network is now created. We can then exit our SSH session and disable it in DSM (if you won’t be using it). If you are disabling it and created a firewall rule for it, you should inactivate the firewall rule as well.

Firewall Setup

Not everyone will be using Synology’s Firewall, but if you are, you need to open port 3000, 80, and 53. 3000 is used for the initial setup process, 80 is used after the setup process is complete, and 53 is used for DNS querying. NOTE: after the setup process is complete, you can close port 3000 if you’d like.
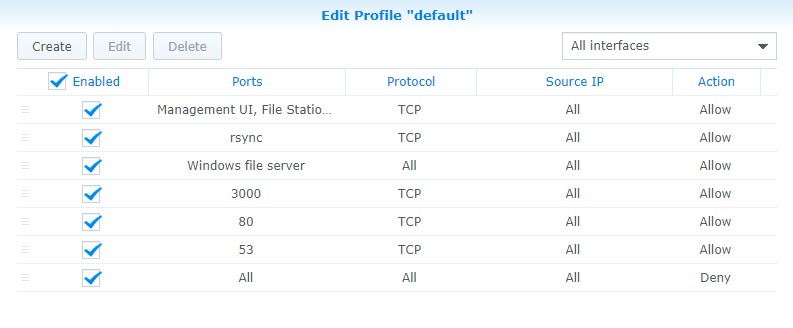
firewall rules in synology dsm for adguard home

5. Next, we need to create a bridge network. This is what will allow our host (NAS) to communicate with our Pi-hole container. Open Docker and navigate to the Network section. Select Add and enter a subnet that’s not currently in use. The IP address of the bridge I am creating will be 192.168.10.2.
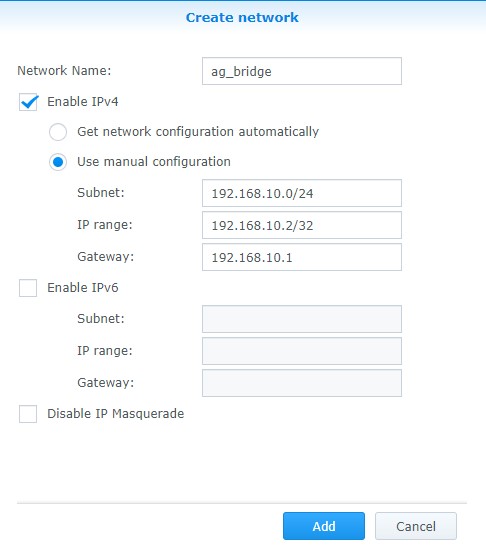
creating adguard home bridge network

6. Open Docker, navigate to the Registry and search for AdGuard. Double click adguard/adguardhome image to download it. Select latest when the popup appears.
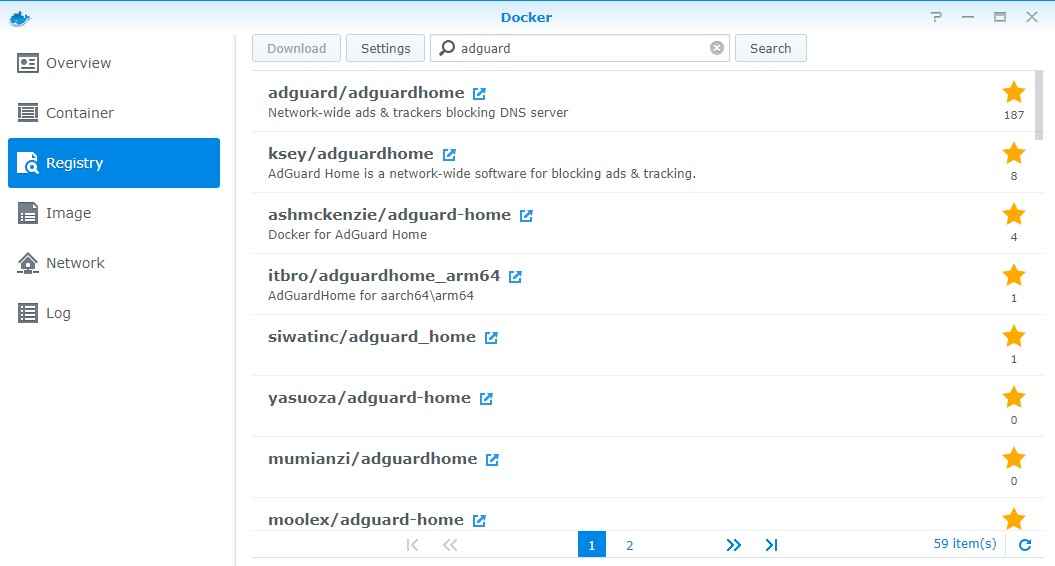
how to install AdGuard Home on a Synology NAS - downloading container from registry

7. Double-click the AdGuard image to create a new instance.

synology nas adguard home - creating container from image

8. Give the container a name and select Advanced Settings.
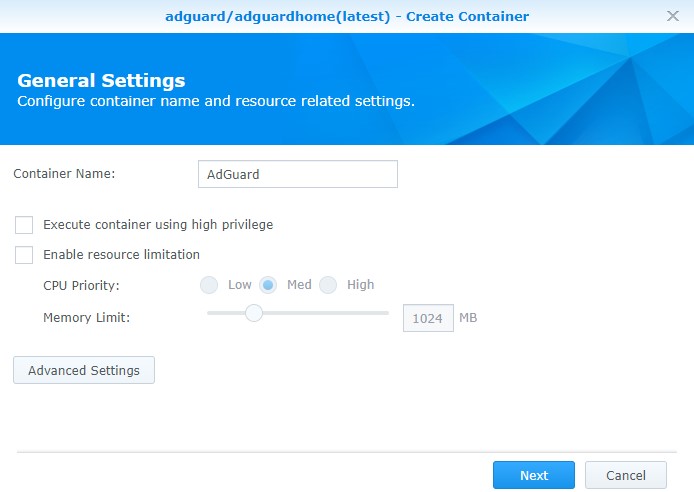
synology nas adguard home - giving container a name

9. We now need to configure the Advanced Settings.

  • Check off Enable auto-restart.
  • In the Volume section, we need to map the folders we created to the internal Docker Pi-hole locations. Select Add Folder and add the conf folder and type the mount path as /opt/adguardhome/conf. Do the same for the data folder with the mount path as opt/adguardhome/work/data.
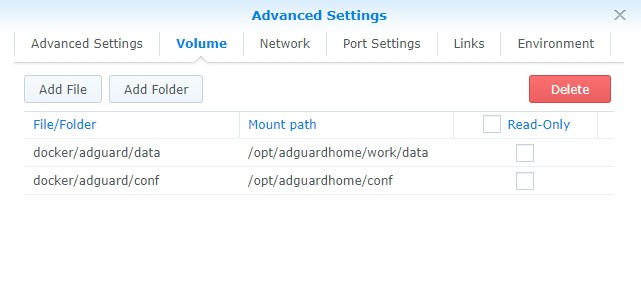
synology nas adguard home - setting up volume mounts
  • In the network section, add the ag_network and ag_bridge networks that we created earlier. Remove the default bridge network.
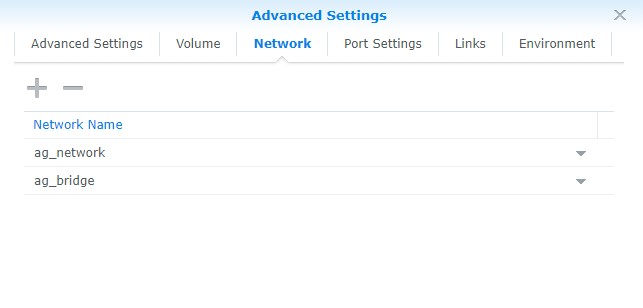
synology nas adguard home - adding adguard networks

The rest of the settings can stay as default. Select Next and then Apply to create the container.

10. You should now be able to access AdGuard Home using this web address:

http://[IP_ADDRESS]:3000

11. Select Get Started to start the configuration process.
connecting to adguard home web interface

12. Specify the macvlan connection to be default for the admin interface and DNS server.
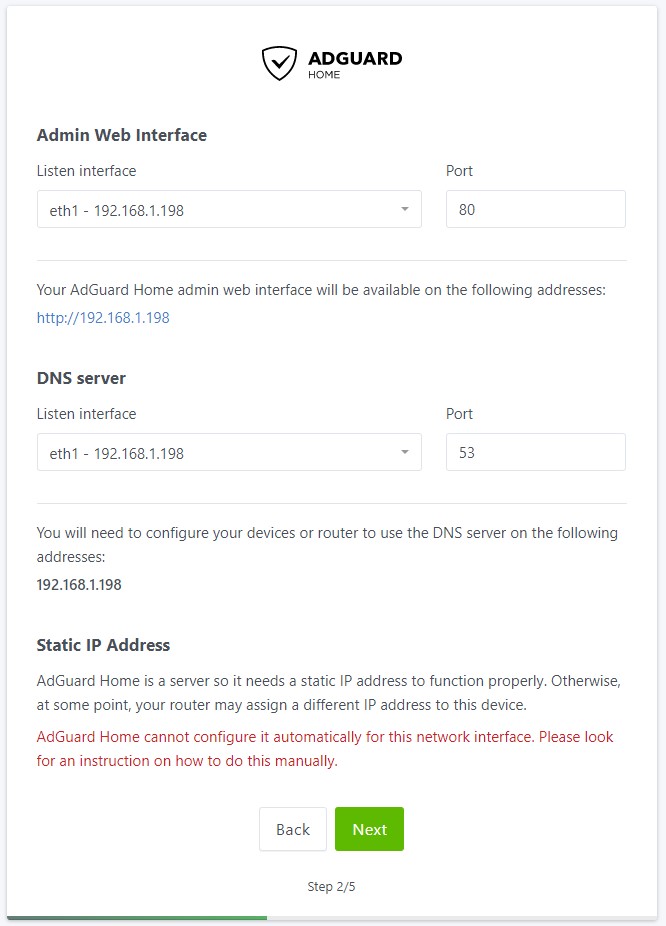
selecting the correct interfaces in adguard home

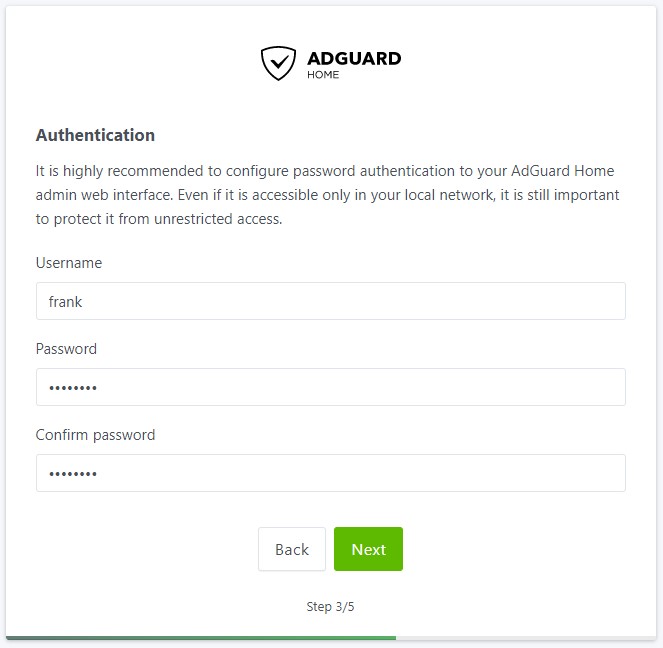
13. Specify a username and password.

authenticating to adguard home

14. The next screen will show you how to configure different devices. In the next section, I will go over my preferred approach which is setting AdGuard Home to be my router’s DNS server. If you aren’t interested in doing that, this is a great section to learn how to set up the DNS server on your local device.
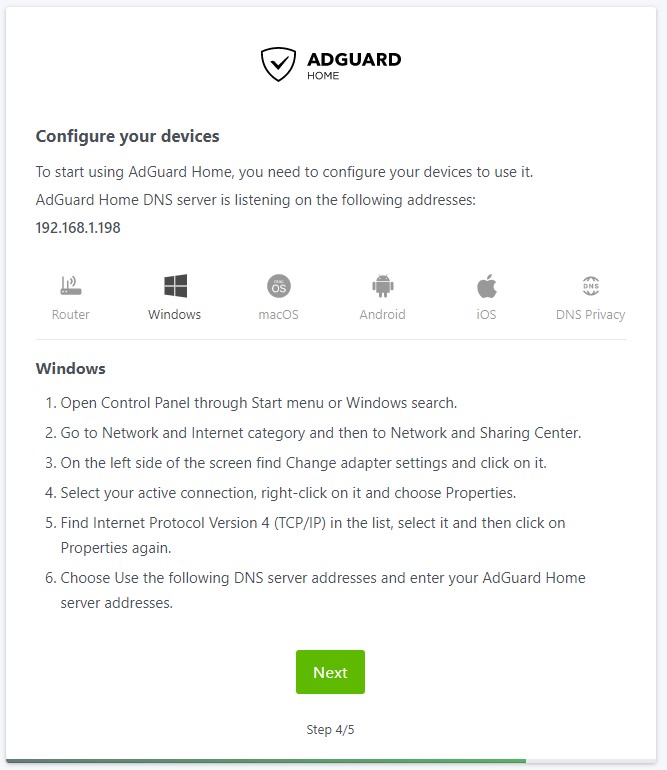
device configuration section

15. Select Next and then Open Dashboard. Sign in when prompted.

16. AdGuard Home is now set up and installed. Please note that you will no longer use port 3000 when navigating to the web portal. After the setup process is complete, you will be able to access to management portal using the macvlan IP address only (as it uses port 80).

https://[IP_ADDRESS]

Synology NAS AdGuard Home Settings

I’m not going to go into specifics as far as settings go because they’re mostly personal preference, but here are a few things you might want to check right after installation:

  • Settings – DNS Settings: These are your upstream DNS servers. By default, the upstream DNS server will be listed as quad9 which is encrypted DNS-over-HTTPS. If you don’t configure a certificate, you will not get the benefits of DNS-over-HTTPS.
  • Settings – Encryption Settings: This is where you will configure your certificate if you’d like to enable DNS-over-HTTPS. The AdGuard team has a pretty good tutorial here that will show you how to configure it if you’re interested.
  • Settings – General Settings: The majority of settings are somewhat self-explanatory on this page but this is where you can configure logging and query retention.
  • Filters – DNS Blocklists: This is where you can add new blocklists (if you’d like to add any).
  • Filters – Blocked Service: Quickly block an entire service.
  • Filters – DNS Allowlists: Define domains that should not be blocked.

There are plenty of options that you can play around with but these are some of the most important ones right after installation.

DNS Configuration

Now that the setup of AdGuard Home is complete, we need to determine a way to point our clients to our DNS server. There are two main ways to do this:

  • Point your router’s DNS server to your AdGuard Home server IP address. This will ensure that any device connected will use AdGuard Home as its DNS server.
  • Point each client to your DNS server. This is beneficial if you only want certain clients to use AdGuard Home as a DNS server.

I point my routers DNS servers to my AdGuard Home server as I want to ensure every device connects to it.

NOTE: The 192.168.1.197 IP address below is the IP address of my Raspberry Pi, as I am using two DNS servers for redundancy. If you are only using your Synology NAS, you will only add 192.168.1.198 here.

dns server settings on router

Conclusion: How to Install AdGuard Home on a Synology NAS

This tutorial looked at how to install AdGuard Home on a Synology NAS. I’ve been using AdGuard home for a few weeks and I’m pretty impressed with it.

It’s impossible to not talk about Pi-hole when discussing AdGuard Home, so it’s important to do some research and pick the best option for you. I think that ultimately, you can’t go wrong with either and you’ll be happy one way or the other!

Thanks for checking out the tutorial on how to install AdGuard Home on a Synology NAS. If you have any questions on how to install AdGuard Home on a Synology NAS, please leave them in the comments!

WunderTech

WunderTech is a website that provides tutorials and guides on various NAS, server, networking, and infrastructure-related topics. WunderTech is maintained by Frank Joseph, an IT professional with 14+ years of experience in corporate IT and application management. He focuses on sharing his experience with others on his WunderTech website and YouTube page. Frank holds a Bachelor of Science in Computer Information Systems and a master of Business Administration (MBA).

This Post Has 87 Comments

  1. Auri

    Thank you so so so so so very much. I have been trying to get this container working via another site and they just don’t seem to know what they are doing.. I needed that macvlan setup badly. It’s working perfectly and no port 53 conflicts.. I’m working on my lists as we speak..

    Namaste WunderTech!

  2. YnY

    what a wonderful article. thanks a lot

    Finally got ADH worked on my Synology, one big mistake during the installation of ADH I made was using the IP address from here without change to my NAS IP range (mine was in 172.x.x not 192.x.x). lol

    Worth to mention, my reverse proxy need to point to the bridge IP created (not the macvlan one), also my Synology DNS need to point to router, not ADH

    I also happen to have a QNAP at home, but some how its not working as smooth as Synology on this deployment, the answer I found from internet is that QNAP has its own protocol on docker, instead of macvlan, but I gave up. My QNAP (with i7 8700t cpu) is so much more powerful then Synology, but saidly is not that user friendly as Synology, really need more deep knowledge on many occasions and no where as stable as Synology.

    1. WunderTech

      Thanks so much and glad you got it working! A while ago when I started looking at NAS devices, I was interested in QNAP due to the better hardware, but found quickly that Synology’s software is superior like you did.

  3. OP

    Hi WunderTech, I might have overlooked something, maybe you have an idea.
    Setup went fine. I adjusted your settings to my network setup (using bond0 as network adapter). After all AdGuard comes up with only infos in protocol. It also shows 3 addresses with port 3000 where I should be able to reach setup… except I can’t. Firewall was opened as suggested. What did I miss?

    1. WunderTech

      I haven’t tried to create it with a bond network, but do you have a single IP address for that bond network? Are you receiving any errors in Docker?

  4. Ryan

    WunderTech, Thank for for doing this, very useful information and it is appreciated! I’m having a small issues everything works however when I use the following command:sudo docker network create -d macvlan -o parent=bond0 –subnet=10.1.3.0/24 –gateway=10.1.3.1 –ip-range=10.1.3.55/24 ag_network AdGuard is always still found at 10.1.3.2 never the .55?

    My ag_bridge
    10.1.12.0/24
    10.1.12.2/32
    10.1.12.1

    Thank you,
    Ryan

    1. WunderTech

      Are you using /24 for any reason in specific? That will give a range as opposed to a single IP address. If you change that to /32, it should work properly.

  5. Henry

    So I put this code in through SSH. And get a no plugin found error.

    sudo docker network create -d macvlan -o parent=eth0 –subnet=192.168.0.0/24 –gateway=192.168.0.1 –ip-range=192.168.0.198/32 ag_network
    Error response from daemon: No plug in found.

  6. Henry

    I tried multiple times inputting your command in Putty. And i keep getting this message

    $ sudo docker network create -d macvlan -o parent=eth0 –subnet=192.168.0.0/24 –gateway=192.168.0.1 –ip-range=192.168.0.198/32 ag_network
    Error response from daemon: plugin not found

    1. WunderTech

      That’s a strange error to get – what NAS device are you using?

      1. Henry

        I’m experimenting on a custom build PC running Xpenology. Emulating DSM 6.0.2 ds3615xs.

        1. WunderTech

          How do you have Xpenology installed? That’s almost certainly the issue – are you positive the NIC in the device you’re using supports macvlan network interfaces?

  7. JA NYC

    “192.168.19.2” above should read “192.168.10.2” (before someone thinks “No wonder it didn’t work!” 😉

  8. JA NYC

    Thanks so much for this!

    It’s finally up and running and works amazingly well even with minimal tweaking. I love how you can serve so many different flavors of DNS to different devices. Combined with the with Brave ad/tracker blocking it’s lightning fast and the ad whitespaces disappear completely. Web pages load almost instantaneously now!

    I had an issue trying to make 192.168.1.198 the primary custom DNS server on the TP-link router modem/internet configuration page (it showed a popup message that it wouldn’t allow a DNS server with the same subnet).

    I tried using the 192.168.10.2 bridge server (which it accepted) but it wasn’t pingable except by the NAS. So I tried the static routing trick from your VPN tutorial (In this case I set destination as 192.168.10.0, mask 255.255.255.0 and used the IP address of my NAS as the gateway). This made 192.168.19.2 pingable by all devices and the router didn’t squawk when I entered it in as primary custom DNS.

    Only it didn’t work. No DNS connectivity for clients even though the AdGuard log showed the router itself was actively sending and receiving some DNS queries.

    I finally noticed that the router DHCP server tab (which I’ve rarely used since I usually configure IPs manually from the client side) also had an option to add custom DNS servers and even accepted servers on the same subnet without squawking!

    So I made a table of all the network device MAC addresses and existing associated IPs (10 in total) and copypasted the data into the DHCP address reservation area (which I hadn’t used before). When I finally activated the entries in the reservation table after switching all the client adapters to DHCP the problem was solved with no issues even though the iP addresses were not in the specified DHCP auto-assignment range!

    I thought I would share this fix if anybody else had similar issues.

    DNS blocking is definitely one of the cooler things you can do with a NAS. I just ordered a raspberry pi for a backup server.

    So far your excellent tutorials have got me up and running with Plex/Docker, OpenVPN server and now Adguard/Docker.

    Thanks again, I really appreciate it!

    1. WunderTech

      Really great info, thank you very much for sharing!

  9. A Bloke

    Firwewall rule should allow UDP 53. It didn’t work until I did this.

    1. WunderTech

      Great input, thank you for sharing!

  10. Sam Lowry

    AdGuard Home is still working great. Questions: Does it automatically update? If not, what do you recommend as the best (easiest) way? How to determine what version I’m on? Thanks!

  11. Olli

    Is there any chance to activate IPv6 ? For me it looks like my system is going to take the IPv6 DNS of my Fritz!Box. And somehow I don’t want to deactivate IPv6 support.

    1. WunderTech

      AdGuard Home does support IPv6. I don’t personally use it so I can’t give any personal recommendations, but if you google “AdGuard Home IPv6”, there are a ton of different explanations on it. Sorry for the lack of help, I just don’t have experience with it.

  12. John Williams

    Great article! I set it up on two Synology boxes for primary and secondary.

    One question – why do you check off auto-restart? Wouldn’t you want it to restart if it dies?

    1. WunderTech

      Thank you! The auto-restart checkbox will just ensure that the container starts when the NAS is rebooted.

  13. stefan

    how do i setup adguard and nginx proxy manager? im try to setup a second macvlan but thats not working.
    o the first macvlan i used for nginx proxy manager

    Error response from daemon: network dm-78ced7cacc72 is already using parent interface ovs_eth0

    1. WunderTech

      You unfortunately can’t create two macvlan network interfaces for the same network interface card. Do you have a second ethernet port that you can create that macvlan network interface on?

      1. Stefan

        Aahh yes i plug-in a second ethernet and everything works. Thank you so mutch for your help. !

  14. stefan

    hallo,

    i have also follow your nginx proxy manager on synology and this is working with macvlan network. but i can not get a second macvlan setup for this one. im getting failed to allocate gateway Address already in use what can i do to get this to work ?

    thank you for help

    1. WunderTech

      I believe that you can only have one macvlan network interface per network interface port, unfortunately. Are you using a NAS with multiple ethernet ports and if you are, can you try assigning it to one of the other network interfaces?

  15. Camus

    When setting up the container, did you assign all external ports to match the container port, or just port 53 (TCP/UDP)?

    Also… have you designated “clients” in AGH? I’ve added both an IP and MAC address client, but neither show in the Top Clients statistics, and custom client filtering has no effect.

    Thanks for a nice write-up.

    1. WunderTech

      Are you using the macvlan network interface? If you are, you should be able to use the default ports (since they will have their own port configuration).

      For the client section, I believe that you have to either manually set the DNS on each device (meaning not to use the router), or use AGH as the DHCP server.

  16. Fabrice

    i WunderTech and thanks for the tuto you help me with the macvlan part. Indeed, my target setup is to have adguard forward local domain requests to local DNS right on the Synology NAS. The service uses port 53 and cannot be changed.

    So now everything works fine (I mean my NAS on 192.168.0.12 and adguard on 192.168.0.253) except local domain resolution. I’ve configured my upstream DNS server list with :

    https://dns10.quad9.net/dns-query
    [/local/]192.168.0.12
    [//]192.168.0.12

    But while using the “test upstreams” button, it fails with error “Server “192.168.0.12”: could not be used, please check that you’ve written it correctly”
    I’ve tried with 192.168.0.12:53 but no luck.

    192.168.0.12:53 is working well as standalone DNS.

    Any idea ? Thanks !!

    1. WunderTech

      If you want to communicate between the container and the NAS, you will have to use the bridge network IP address (192.168.10.2 in the tutorial). This is how the host (NAS) and container can communicate!

  17. Sam Lowry

    Me again. I was wrong. I’m stuck at #4. I know I should put in eth0 ( i checked with SSH), I plugged in my usual subnet 255.255.255.0 (and added /24). Put in gateway of my router ip, chose an IP address not in use (and added /32).

    I get “no matching subnet for range 10.0.1.x/32”. None of this is obvious to me.

    1. WunderTech

      Can you send the exact command that you ran so I can try and troubleshoot exactly what it could be?

      1. Sam Lowry

        Work got in the way of responding to you but here goes. Here’s the command I used:
        sudo docker network create -d macvlan -o parent=eth0 –subnet=255.255.255.0/24 –gateway=10.0.1.1 –ip-range=10.0.1.66/32 ag_network

        error: no matching subnet for range 10.0.1.66/32

        According to ifconfig: inet addr:10.0.1.6 Bcast:10.0.1.255 Mask:255.255.255.0

        1. WunderTech

          Can you try using this command?

          sudo docker network create -d macvlan -o parent=eth0 –subnet=10.0.1.0/24 –gateway=10.0.1.1 –ip-range=10.0.1.66/32 ag_network

          1. Sam Lowry

            Got a new message and not sure what it means:

            “docker network create” requires exactly 1 argument.
            See ‘docker network create –help’.

            Usage: docker network create [OPTIONS] NETWORK

            Create a network

          2. WunderTech

            I think that the site is indirectly changing the two dashes to an em-dash.

            sudo docker network create -d macvlan -o parent=eth0 –subnet=10.0.1.0/24 –gateway=10.0.1.1 –ip-range=10.0.1.66/32 ag_network

            Not sure how it will display on your screen, but make sure that the subnet, gateway and ip-range all have two dashes before them — (if it doesn’t show, – – without the space in between).

          3. Sam Lowry

            You were right, the double dashes were getting stripped. I have made it to #5 in your instructions!

            Stuck again. I tried creating a your ag_bridge but it kept telling me that my gateway was wrong. What would be appropriate settings? I need to create a new ip address right? I’d like it to be 10.0.1.67. The link below

            https://imgur.com/a/TBFlhgY

            Thanks again! Sorry for the slow brain on my part. I am new to using my Synology for more than music…

          4. WunderTech

            Not a problem! You have to use a different subnet range. In summary, the subnet you’re using is 10.0.1.X for your local network. The subnet you use for the bridge has to be different than that, so I would suggest 10.0.10.X. If you set it as these values, it should work.

            Subnet: 10.0.10.0/24
            IP range: 10.0.10.2/32
            Gateway: 10.0.10.1

            You would then use the 10.0.10.2 IP address to communicate between the container and the NAS (if you wanted to set the NAS’s DNS server as AdGuard Home, for example). You will ONLY use this IP address for communication between the container and NAS. All other devices will go through macvlan’s IP address.

          5. Sam Lowry

            Woohooo! All good now! Thanks for your help. I even understand it.

            Now I can move on to complaining how much of a pain blocking YouTube ads is…

          6. WunderTech

            Glad you got it working!

  18. Sam Lowry

    I’m super confused, but ready to learn. I’m stuck at #5. My router gateway is 10.0.1.1 but it is telling me that this gateway is out of range. My usual network subnet is 255.255.255.0.
    Thanks,
    SL

    1. WunderTech

      That is a bridge network (so that your NAS can communicate with the container), so the gateway should be 10.0.10.1. Basically, it needs to be different than your router’s gateway. Let me know if that doesn’t make sense!

  19. adam

    I reinstalled ADguard.
    First no web was accessible.
    Log file:Couldn’t request filter from URL https://adguardteam.github.io/AdGuardSDNSFilter/Filters/filter.txt, skipping: Get “https://adguardteam.github.io/AdGuardSDNSFilter/Filters/filter.txt”: couldn’t initialize HTTP client or transport, cause: timeout exceeded: 11979 ms

    After I turned off the firewall, and a lot’s of prays to the NAS’S gods, suddenly it’s start to work.

    And then I saw in the log another error:Parental: failed: couldn’t do a GET request to ‘https://dns-family.adguard.com:443/dns-query’

    But, the surfing on the web is OK now although 443 port is off.

    1. WunderTech

      That’s definitely interesting, but I’m glad to hear you got it working. I will look further into the port 443 issue, as it looks like that dns-family website could be causing some weird outcomes.

      1. adam

        Updating: It’s stop working again without port 443.
        Does it’s a security issue to open port 443 on the firewall?

        1. WunderTech

          It’s a security concern in the sense that you don’t know why it needs to be open (and neither do I, truthfully). Are you using any special features? DNS-over-HTTPS or anything like that? Anything you changed before it stopped working?

          1. adam

            I figured it out.
            I opened a new rule for the bridge IP:
            All ports of all protocol are allow from bridge IP.

            Now it’s work fine.

          2. WunderTech

            I’m glad that you got it working!

  20. Nicolas

    Hi,
    Great Tutorial!
    Is there any way to configure AdGuard for an external network?
    When I’m in my local network it works perfectly. However, how do I do to set it up when I’m outside my local network or even in 4G?
    Cheers

    1. WunderTech

      Hello! You would have to open a port on your router (or use a reverse proxy), but I’m not sure it’s worth it. You would technically be opening your local network for a DNS server, and I’m not sure I would do that. You obviously are free to do that, but that’s just my opinion!

      1. Nicolas

        Thank you for your answer!
        If you think it doesn’t worth, I won’t do it 😉

        I really like your videos!
        Thank you again,

  21. adam

    Hi can’t access the internet via AdGuard without opening 443 port on the firewall.
    Why?
    In the guide you didn’t say so.

    1. WunderTech

      You should NOT open port 443 to use AdGuard. How do you have it set up? Are you using it locally only or are you trying to access it outside of your local network?

      1. adam

        Locally.

        1. WunderTech

          How are you connecting to the DNS server? The DNS port is 53, so I’m not even sure how 443 is being brought into this if I’m being honest.

  22. James

    Thanks for the quick reply! I actually realised I mistyped the IP addresses above. I followed your guide, setting almost the exact same IPs:

    ag_network (macvlan): 192.168.1.192
    ag_bridge (bridge): 192.168.10.2

    Yes, my iPhone and NAS are on the same subnet. I was trying to test with a non-critical device first so I didn’t disrupt internet for everything else.

    I have since tried directly on the router and it does exactly the same, doesn’t process anything. I set the router back to it’s previous DNS settings and tried the changes directly on Windows and and MacOS with the same issue. I tried both macvlan and bridge IP addresses and, interestingly, I get 2 different error messages in the Windows Network Diagnostics tool. With macvlan (192.168.1.192) I get “The DNS server isn’t responding”. With the bridge (192.168.10.2) I get “Windows can’t communicate with the device or resource (primary DNS server)”. I followed this up with a couple of pings and I do get a reply from the macvlan address but nothing from the bridge. This maybe expected but my networking knowledge is letting me down here 🙂

    Is it possible the AdGuard server is blocking requests on the DNS ports?

    1. WunderTech

      The bridge not responding is expected. The bridge can only be used for communication between the NAS and the container. So if you wanted your NAS to use AdGuard Home, you would set its DNS server as the bridge IP address.

      It’s definitely strange that the container is not properly forwarding requests. Did you properly configure an upstream DNS server?

  23. James

    Hi Frank

    Firstly, thank you so much for such a wonderful resource. It has been invaluable in completely rebuilding my NAS.

    AdGuard is the final piece of the puzzle, however I am having real trouble getting my devices using the new DNS IP. I have set everything up pretty much exactly as you described above. The AG IP is 192.168.1.192 with the macvlan on 192.168.10.2. When I set a device’s (my iPhone is what I’m testing with) DNS server to 192.168.1.192 is just refuses to connect. I can access the AG admin panel on it’s internal IP and I even have external access working on a domain name, although I had to set the reverse proxy address to the macvlan IP (not sure why?). Once I login the admin panel loads but there’s nothing there, no queries, no clients, no data at all.

    The only way I have been able to get it working, on my iPhone at least, is to go to the Setup Guide section, select DNS Privacy and download the configuration profile at the bottom of the page. Once I have that installed it works perfectly and I can see data in the AG admin panel. I presume this is because it is using the domain name not the internal IP?

    I don’t have the Synology firewall turned on (while testing) and the only ports I have open on my router are 32400, 80 and 443.

    I know I must have missed something really obvious but I just can’t figure this one out. Do you have any suggestions? Happy to provide further information.

    Many thanks,
    James

    1. WunderTech

      Hi James!

      I honestly haven’t tried setting a DNS server manually for my mobile device (I normally set the router’s DNS server to be the macvlan network IP so that all devices automatically are routed through AdGuard), but it shouldn’t be different than setting up any other device. I am assuming that you’re on your Wi-Fi network (which uses the same subnet) as where the DNS server is hosted? Is there any way that you can try and connect to it using a Windows or Mac device, as it’s slightly easier to validate that it’s working with one of those?

      Let me know and we can continue troubleshooting!

  24. KS

    Hello

    Not sure if my previous comment for deleted.

    I’ve been trying to set this up as a new Synology NAS user.

    I’m getting stuck on understanding what I need to put when setting up the Macvlan.

    Your example is

    sudo docker network create -d macvlan -o parent=eth0 –subnet=192.168.1.0/24 –gateway=192.168.1.1 –ip-range=192.168.1.198/32 ag_network

    When I enter my version of this I get an error.

    Any help would be appreciated

    1. WunderTech

      What is the error you are getting? Are you using the correct “parent” network interface name?

  25. k18ldp

    Hi Wundertech.

    Just purchased a Synology NAS and have been avidly watching your videos! Great work.

    I am, however, stuck with this one :(. I’m a total novice at this so was definitely expecting a sharp learning curve.

    So I’ve gotten to the part for setting up the Macvlan:

    “4. Next, you need to run the command below while substituting the correct subnet (most are 192.168.1.0/24 or 192.168.0.0/24 by default). You also need to pick an IP address that you’d like to use that’s not currently in use. I will be using 192.168.1.198. NOTE: ag_network will be the name of the network (you can substitute this as you’d like).”

    And I not 100% sure what I should be substituting for the subnet etc.

    For instance if my NAS IP address is 192.168.68.111 would the command I enter in SSH be:

    sudo docker network create -d macvlan -o parent=eth0 –subnet=192.168.68.0/24 –gateway=192.168.68.1 –ip-range=192.168.68.198/32 ks_network

    I tried this and received message:

    “docker network create2 requires 1 argument
    see ‘docker network create — help”

    So I’m totally lost.

    Any help would be much appreciated.

    1. WunderTech

      Thanks so much! You are correct – that command looks correct. Do you know if eth0 is the correct network interface name? Also, for the subnet, gateway, and ip-range, are you using two dashes –? It could just be the formatting on the comment.

      1. K18ldp

        Thanks for the reply.

        eth0 is the correct name…. I will confirm the two dashes again and try again. Wish me luck

        In the meantime I’ve added the Adguard DNS servers into my router which seems to have done a good job in killing most ads (but obviously without the additional functionality)

        1. WunderTech

          Awesome! Hopefully it works!

          1. K18ldp

            It worked!

            The problem (I think!) Was the double dash as per your comments. All working now, thanks for your responses.

            I do have a suggestion for a new video:

            I’m trying to set up logging into Synology Photos or Drive via a web browser. Can see an option of setting it up via a domain name but not 100 percent sure about how to do this….?

          2. WunderTech

            Awesome! I will add this to my list!

  26. dr400

    Hi WunderTech, I’m unable to get it work… Ports (443,53,5443,67,68,784,80,853) are already used by other services … Any idea ?

    1. WunderTech

      Are you able to set up the macvlan network interface? That should avoid any port conflicts you run into.

  27. Nool

    Greetings, thanks for the guide 🙂

    When using this approach compared to the “Use the same network as docker host” i only see 1 “Client” in Adguard Home, which is my router IP.

    With the other approach i was able to see the individual clients (Different pc’s etc) on the Adguard home screen.

    Is there a way to fix this, so make the clients “visible” again?

    Thanks in advance 🙂

    1. WunderTech

      Unfortunately, I don’t believe that you can without setting each client’s DNS servers individually. Since the traffic is sent to the router and the router sends it to the AdGuard Home server, the traffic will all appear as if it’s coming from the router.

      I believe that your only option is to set the DNS server on the PC individually (so that it bypasses the router). I also believe that you might be able to get it to work if you use AdGuard Home as the DHCP server, but I believe that’s an experimental feature that you probably don’t want to use.

  28. Toby

    Hi WunderTech
    thanks for your answer. Do you mean this point in the OpenVPN configuration file:
    dhcp-option DNS 192.168.xy.z

    If yes, then the answer is yes, I tried that already with the bridge IP address. But this doesnt work. I cant even ping that bridge IP address.

    I mean, I cant ping the bridge IP address as soon as I’m connected with VPN to my Synology NAS. But any other device or service in my home LAN is answering correctly on my requests via OpenVPN.

    1. WunderTech

      Yes, that’s what I was hoping would work. One other thing to check – do you have the firewall enabled on your Synology NAS? If so, are you allowing traffic on port 53 to your VPN’s subnet? An easy way to check if it’s the firewall is to disable the firewall temporarily and see if it works.

      Let me know and we can continue troubleshooting!

  29. Toby

    I setup everything and it is working well. I‘m using VPN Server Package on my Synology NAS. When I connect over OpenVPN (different subnet) I‘m not able to make use or connect to adguard. Is there a way (maybe create another bridge) to solve this problem?

    1. WunderTech

      Since you’re using OpenVPN (and it connects through your NAS, I assume), do you have the bridge IP address in the OpenVPN configuration file? If you don’t, that should fix the problem.

      Let me know and we can continue troubleshooting!

  30. Mijzelf

    Thank you very much for the steps, this really helps!
    After updating the router my Synology of course also updated its DNS (192.168.1.197 in your example). But the DNS requests fail on my Synology. That makes some sense, but I was hoping on a loopback.
    But also manually adjusting the DNS to the bridge IP is not working (192.168.10.2).

    From the Synology I cannot ping 192.168.1.197, and I can ping 192.168.10.2 (and 192.168.2.1). Is there something wrong in my setup?

    ps. Second use case is that I would also like to create a reverse proxy on my Synology to AGH. But that is not working due to the same issue.
    Thanks for your help!

    1. WunderTech

      The thing that’s interesting is that your router should be pointed as the DNS server. So on your Synology NAS, 192.168.1.1 should be configured as the DNS server and then the router should point back to the AdGuard Home server (192.168.1.197). I haven’t had any issues with this configuration since the Synology NAS is technically using the router as the DNS server, not the container.

      You were correct in manually entering it as the bridge IP address, but that ALSO should work. As for the reverse proxy, any luck using the bridge IP address?

      In summary, can you double check to ensure that 192.168.1.1 (or your router’s IP) is configured as the DNS server?

      Let me know how it goes and we can continue troubleshooting!

  31. Floris

    Thanks for your detailed walktrough! Work perfect, only I cannot use the safe browsing functionality. I checked all firewall settings but cannot find the answer. Also I can’t find a setting to let Adguard use a differend network interface for outgoing DNS checks.

    My macvlan is 192.168.0.200
    and my bridge is 192.168.100.2

    This is what the adguard log shows:
    [info] SafeBrowsing: failed: couldn’t initialize HTTP client or transport, cause: couldn’t initialize HTTP transport, cause: couldn’t bootstrap https://dns-family.adguard.com:443/dns-query, cause: failed to lookup dns-family.adguard.com, cause: synthetic.wrap: all resolvers failed to lookup, cause: read udp 192.168.0.200:57840->176.103.130.131:53: i/o timeout (hidden: read udp 192.168.0.200:49494->176.103.130.130:53: i/o timeout)

    1. WunderTech

      When exactly are you getting the error? When I enable it, I don’t receive an error and everything appears be working properly. Are you receiving it as soon as you enable it and try and save it?

      Sorry for the basic question, but hopefully we can continue trying to troubleshoot it after that!

    2. Gaston

      I encountered the same error and found out that adding tcp 443 to the synology firewall fixed it.

      Thnx for your great guides! Would love a in-depth guide on adguard settings and https over dns!

    3. Hrv

      Configure your Synology’s firewall to allow all communication from your bridge i.e. 192.168.100.2

  32. Sam

    Thanks for the great write-up! I’ve attempted similar builds before, but finally learned from you that I was missing the additional bridge network. Q: Is there a way to create a macvlan network that has more than 1 IP address, and use this network for multiple containers? Would this approach work if each one had a different bridge network configured in DSM/Docker’s network setup?

    1. WunderTech

      I’m glad to hear that it worked! Thank you for reading!

      You can’t use this macvlan network we created for AdGuard on multiple containers (well, you can, but only one can be started at a time). I haven’t personally tested this out, but I assume that you can run the exact command that we used “sudo docker network create -d macvlan…” and replace the “192.168.1.198/32” with “192.168.1.0/24”. This will define the IP range as an actual range as opposed to an individual IP address.

      The same is true for the bridge, since we defined one specific IP address for the bridge. Instead of setting the IP range as 192.168.10.2/32 (which is only one IP address), you can try setting it as 192.168.10.0/24. This should allow it to hand out IP addresses from that range which would do what you’re looking for.

      This issue with this is that you won’t know the IP address that is being assigned to your containers (which is very important for things like DNS servers and a lot of other services). You also might be in a position where the container restarts and gets a different IP address (unless you do a DHCP reservation in your router).

      I guess if I had to give a suggestion, I’d create multiple macvlan/bridge networks for the specific services that you’d like to have unique IP addresses. Since most Docker containers run perfectly fine using the host network interface, you’re generally creating macvlan/bridge networks for containers that might have port conflicts (DNS servers, for example).

      I realize that this is a very long answer for your fairly simple question, but I wanted to ensure that I covered all bases. If you have any additional questions, please let me know! Thanks again for reading!

      1. Sam

        Thanks for replying! It definitely makes sense that the /32 network can only be used by one container at a time (never hurts to restate the obvious). However, if I understand macvlan correctly, each container on this network would be given its own virtual MAC address, which could allow the use of DHCP reservations to assign known IP addresses, right?

        I did try the idea of creating multiple /32 macvlan networks via the shell, but ran into the error response “failed to allocate gateway (192.168.1.1): Address already in use” after the first one. The same type of error unsurprisingly occurred when trying to make a second bridge with the same gateway via the DSM web interface.

        To recap, and to make sure I am following correctly, it is the IP address of the container itself on our macvlan network, and not the IP address of the bridge that we need to know about, correct? Would you say that the following is accurate?
        * The bridge network could be a /24 with the full IP range enabled.
        * The macvlan network could be expanded; let’s use a /28 for example, with 16 IPs (14 usable).
        * Use the –ip parameter when starting the container to set its IP address.

      2. Sam

        I guess my lingering question revolves around not knowing exactly how the bridge network functions. Does the bridge network need a 1:1 IP address for each container’s IP address, or is the bridge more of a network level…bridge…that only needs one IP of its own in order to perform its function?

Leave a Reply