How to Set Up Pi-Hole on OpenMediaVault!

Today we are going to install Pi-hole on OpenMediaVault using Docker and Portainer.

Fortunately, OpenMediaVault makes it very easy to install Docker and Portainer. We will be installing Pi-hole on Portainer and using a macvlan network interface so that we don’t have any port conflicts with our OpenMediaVault instance. If you haven’t installed OpenMediaVault yet, you can learn how to do that here.

Before we get started, it is incredibly important to note that having redundant DNS servers is very important. I highly suggest that you purchase a cheap Raspberry Pi Zero and configure Pi-hole on it so that you have two Pi-hole DNS servers. This will ensure that when your NAS is rebooted, your clients do not lose DNS resolution services.

Instructions – Pi-Hole OpenMediaVault

1. Login to OpenMediaVault and select OMV-Extras on the left-hand side. If you don’t have OMV-Extras, you will need to install it from the Plugins section.
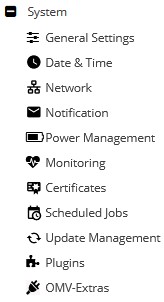
openmediavault pi-hole - settings in openmediavault

2. Select the Docker tab, then click the Docker drop-down and select Install. Docker will now install.
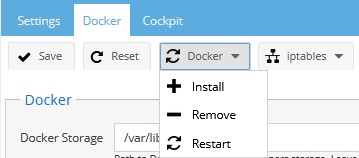
openmediavault pi-hole - installing docker in openmediavault

3. Select the Portainer drop-down and select Install. We will be using Portainer to install Pi-hole.

4. When Portainer finishes, restart your Raspberry Pi and when it comes back up, Open Portainer.

how to open portainer

5. Set up your username and password for Portainer.
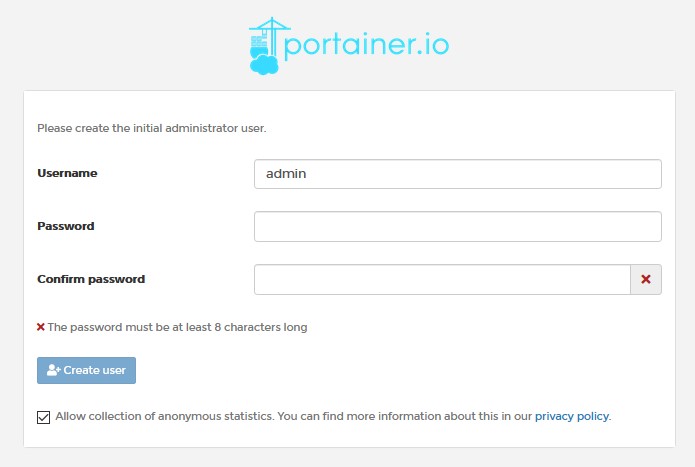
openmediavault pi-hole - creating the administrator user

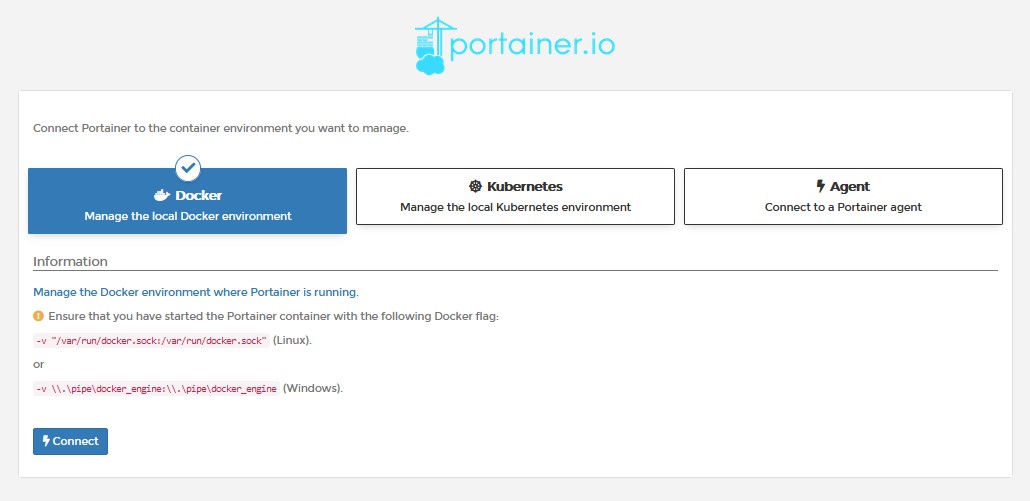
6. Select Docker and then Connect.

openmediavault pi-hole - docker settings in portainer

7. Select Local. Leave this up in the background and we will get back to it in a few steps.

local docker container in portainer

8. Now that Portainer is set up, we need to create a docker macvlan network interface. SSH into your Raspberry Pi the same way you did when you initially set up OpenMediaVault. We need to determine what network interfaces currently exist (on your Raspberry Pi) and note down the adapter name. To do this, run the command below and note down the network interface name that has your Raspberry Pi’s IP address (in this example, mine is enxb827eb03ae0e).

ifconfig
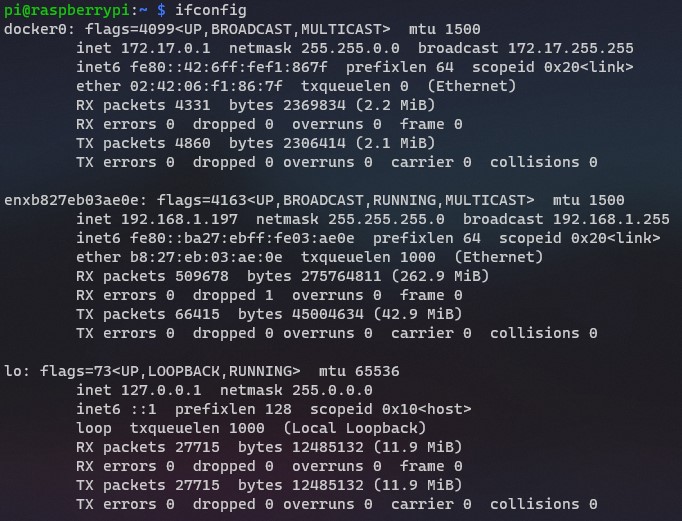
viewing the ip addresses in terminal for the raspberry pi

9. Next, you need to run the command below while substituting the correct subnet (most are 192.168.1.0/24 by default) and network interface ID (mine is enxb827eb03ae0e). You also need to pick an IP address that you’d like to use that’s not currently in use. I will be using 192.168.1.195. NOTE: ph_network will be the name of the network (you can substitute this as you’d like). The items listed below in pink might need to be updated when you run this command.

sudo docker network create -d macvlan -o parent=enxb827eb03ae0e --subnet=192.168.1.0/24 --gateway=192.168.1.1 --ip-range=192.168.1.195/32 ph_network

10. The network interface is now setup. Go back to Portainer and select Volumes.

11. Select Add Volume and add two total volumes. One with the name etc-pihole and one with the name etc-dnsmasq.d.
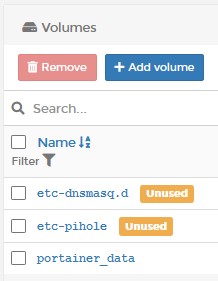
openmediavault pi-hole - creating volumes in portainer

12. Select Containers and then Add Container.
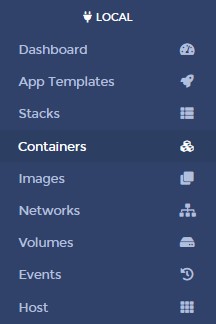
openmediavault pi-hole - portainer containers
adding a container in portainer

13. Give the container a Name and then in the Image section, enter pihole/pihole:latest.
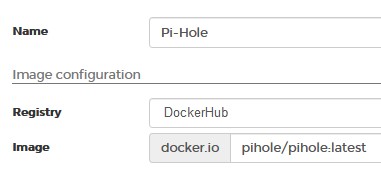
openmediavault pi-hole container name

14. Select Publish a new network port five total times and match the ports as the screenshot below shows. NOTE: Ensure that you have the two top ports (53, 67) set as UDP ports.

openmediavault pi-hole - port settings for pi-hole

15. Select Volumes and select map additional volume twice. Enter the first container as /etc/pihole and select the /etc/pihole volume. Enter the second container as /etc/dnsmasq.d and select the /etc/dnsmasq.d volume.

openmediavault pi-hole - volume settings for pi-hole

16. In the Network tab, select the macvlan network we created earlier.

adding the pi-hole network created

17. In the Env section, enter the two variables in the screenshot below. Ensure that you replace WEBPASSWORD value with the password that you’d like to use to access Pi-Hole. Also, change the ServerIP value to match the IP address you created for your macvlan network interface.

adding pi-hole environment variables

18. In the Restart Policy, change this to Always. This will force Pi-Hole to always start when Docker starts.

changing the restart policy of the container

19. Finally, in the Capabilities, turn on NET_ADMIN.

modifying the capabilities of the docker container

20. Select Deploy the container. The container will take a few minutes to fully download and install, but when it’s done and reporting running, you will be able to access the Pi-Hole web admin interface using the ServerIP address you assigned!

http://[serverIP]

DNS Configuration

Now that the setup of Pi-hole is complete, we need to determine a way to point our clients to our DNS server. There are two main ways to do this:

  • Point your router’s DNS server to your Pi-hole server IP address. This will ensure that any device connected will use Pi-hole as its DNS server.
  • Point each client to your DNS server. This is beneficial if you only want certain clients to use Pi-hole as a DNS server.

I point my routers DNS servers to my Pi-hole server as I want to ensure every device connects to it.

dns server settings for the router

Conclusion

Setting up Pi-Hole on OpenMediaVault isn’t too bad thanks to Portainer. Technically, this tutorial will work for any Docker instance where Portainer is installed if OpenMediaVault isn’t something that you have installed!

Thank you for reading the tutorial! As always, if you have any questions, please leave them in the comments!

WunderTech

WunderTech is a website that provides tutorials and guides on various NAS, server, networking, and infrastructure-related topics. WunderTech is maintained by Frank Joseph, an IT professional with 14+ years of experience in corporate IT and application management. He focuses on sharing his experience with others on his WunderTech website and YouTube page. Frank holds a Bachelor of Science in Computer Information Systems and a master of Business Administration (MBA).

This Post Has 102 Comments

  1. Philippe

    Hi, great support, 1st run 1st success, try other tips found on the web, most simple, run in 1 shoot.
    Just needed to rename the “hostname” but tips is given is the discussion.
    I suppose when new pi-hole version will release jus need to type again pihole/pihole:latest in the “docker.io” and run “create”

    1. WunderTech

      That is correct! Glad that it helped!

  2. Tiiara

    Hey there, great guide. Really easy to follow.
    Everything seems to work fine, portainer works, pi-Hole container shows healthy but I can’t connect to the web admin. Browser shows connection timeout. Any ideas?

  3. Tiiara

    Hi there. I followed your guide to the best of my knowledge but I’cant seem to access the pihole admin page. I always get a network timeout. My router (Fritzbox) does find the device, but I cannot connect at all.
    In portainer the pi-hole container is running as healty.
    I used this command in SSH $ sudo docker network create -d macvlan -o parent=eth0 –subnet=192.168.0.0/24 –gateway=192.168.0.1 –ip-range=192.168.0.199/32 ph_network
    Any ideas? Any information you need for troubleshooting?

    1. WunderTech

      If the router finds it, then it’s most likely there. Are you using the correct port? This will generally be 80, but if you changed it to something different, you will have to use that.

      1. Tiiara

        No, I didn’t change any ports.I also tried deleting everything and going trough the setup again but still nothing. I did spot something interesting. The router only found the IP during or shortly after the initial setup. I tried restarting OMV and after that the IP shows as offline in the routers webadmin, but it is still running in portainer and showing as healthy.

      2. Tiiara

        I tried pinging my router via the terminal in Containers > Pi-Hole > Console and THIS works. But it does not work the other way around. Maybe some kind of security feature or setting I’m unaware of?

        1. WunderTech

          If the container isn’t getting an IP address, then there’s a problem at that point. Just for testing, can you try creating a container without the macvlan and see if you can access it? Map the port 80 to something different (8080 for example).

          1. Tiiara

            Just to make sure I don’t brick my OMV: You want me to try following your guide, skipping the first step with the mcvlan network and create the container just as in the guide, but change the manual network port publishing from host 80 > container 80 to host 8080 > container 80. Also, in the Advanced container settings under “Network” I leave “Network” as “bridge” and the “environment variable” “ServerIP” should now be the same as the one used for OMV , right?

          2. WunderTech

            That is correct, but I would suggest that you ensure you have proper backups if you plan on playing around. I don’t really think this will have any impact on OMV, but I always suggest having a rollback plan.

  4. Martin

    Great guide, It works for me without issue.

    but I have a question regarding the Volumes you setup.
    /etc/pihole & /etc/dnsmasq.d

    Why is this needed? What if I skip that step?

    1. WunderTech

      Thanks! Those locations are mapped to a volume so that you can move your personal data (from Pi-hole) to a different system/container if you’d like.

  5. Dominik

    Hi,

    i face several issues which might hav one root cause.

    1. when i try to update gravity it runs in a timeout:
    [X] DNS resolution is currently unavailable
    [X] DNS resolution is not available

    2. from the Docker Console i cannot ping my Gateway..

    Here are my IPs:

    OMV: 192.168.128.254/24
    Gateway: 192.168.128.1
    (old PiHole already shutted down and deleted from several configs): 192.168.128.250
    PiHole (Docker): 192.168.128.53

    i’ve added the env “DNS1=127.0.0.1” and “DNS2=” but this didn’t work

    i also cannot change the /etc/resolv.conf from the Docker Console because wether nano nor vi is installed. Since i cannot reach my GW i cannot install one of those editors.

    The Output from “cat /etc/resolv.conf” is:

    nameserver 127.0.0.11
    options ndots:0

    i did step by step from your tutorial. I hope you have an idea.

    1. WunderTech

      I have run into that issue on my Synology NAS, but not on OMV. Can you create a file somewhere on your system called “resolv.conf”, add two different lines with:

      nameserver 127.0.0.1
      nameserver 8.8.8.8

      Then map a file volume to the location of that resolv.conf file, with the mount path as “/etc/resolv.conf”. I suspect this should fix it.

      It’s in these Synology NAS instructions, it’s just a different GUI – should be the same steps though: https://www.wundertech.net/how-to-setup-pi-hole-on-a-synology-nas-two-methods/#macvlan

  6. Cody

    Works great. How do I add unbound to this pihole container? I am struggling to find a way to run pihole and unbound in the same container.

    1. WunderTech

      Using Docker is slightly tricky. I’m assuming you installed Unbound on the host and then Pi-hole inside of Docker? Did you use a macvlan network interface/bridge network interface? If so, I believe you can use the bridge IP address and it should function properly.

  7. caio

    Hello I followed your tutorial with raspberry pi 4 and omv 5 successfully, but in volumes I indicated to the share folder of my external hd config, and no pihole file is created, I remember that when I used it in the past, files were created in this folder, you know why does this occur?

    1. WunderTech

      I am not entirely sure why it wouldn’t be there. Have you considered running Pi-hole in Docker?

  8. Hemant

    Good Day

    worked like a charm. thanks

    i have disabled the query logging thru web interface however need your help to increase the log database interval.

    rgds
    Hemant

  9. Marcel

    Hi and thanks for the great tutorial!
    I follow your steps, but i get one Error: I can`t accsess with my password to pi-hole.
    When I click on the container, I see the password I assigned under Webpassword. But when I enter it on the start page of Pi-Hole, I always get the message that it is wrong. What can I do here? (My container is on healty state)

    1. WunderTech

      Just to confirm, you have “WEBPASSWORD” in all caps, right? Not sure if that’s a requirement. Also, if it is, did you set it before the container was created? The container has to be created with the environment variable (cannot be added after).

  10. AJ

    Beginners question. What am i missing?

    Failure
    failed to create endpoint Pi-Hole on network ph_network: network id “683713e858a7a8a84b5b04aa2484003345d8323eac2581a4da12f58c8fe12070” not found

    1. WunderTech

      Where exactly are you getting that error? Is this on the macvlan network interface side or somewhere else?

  11. Quadruplicus

    I pasted it the way you described it and http://192.168.1.xxx:80 becomes 192.168.1.xxx in the address line of my browser.
    In the portainer.io interface i see 2 containers in the container list.
    1.portainer | running |
    2.Pi-hole | healthy
    So i guess my Pi-hole container is running.
    Also, the Pi-hole container has no published ports if this is of importants.

    1. WunderTech

      Yes, that’s most likely the issue. Can you try and publish the ports as shown in the tutorial?

      1. Quadruplicus

        I set them up like in the tutorial but they dont appear as published ports, i also tried to switch the “Publish all exposed network ports to random host ports ” button to on but it did nothing.

        1. WunderTech

          That is most likely the issue. In some capacity, you have to get the ports to publish otherwise it won’t be listening and you won’t be able to access the admin page. The only guess I have is that it’s not using the maclvan network interface properly (and trying to use the host) and there is some sort of port conflict.

          1. Quadruplicus

            I started from scratch and repeated all step, when picking an IP address for the macvlan i chose a different one and it worked this time.
            Thanks for your support.

          2. WunderTech

            Glad you got it working!

  12. Quadruplicus

    Hi WunderTech,

    i have trouble with step 20. I deployed the container but i cant access the Pi-Hole web admin interface using the ServerIP. It simply cant seem to find the ip adress.
    My container is on healhy state.

    1. WunderTech

      To confirm, you put the server IP as the macvlan network interface IP address that we created (192.168.1.195 in the tutorial) and you’re using port 80 to try and access it?

      1. Quadruplicus

        yes, i put the serverIP as the macvlan network interface IP address. I also created some ports as we had to do in step 14 but i did not use any ports to access it. If i try to put the serverIP address + port (e.g. 192.168.1.xxx:80) into my browsers address line it ignores the port and tries to access the serverIP itself, eventually i get a network time out message from my browser.

        1. WunderTech

          If you’re using port 80, it’s not actually ignoring it, it’s just the default port. Are you using http or https? It should be http://[MACVLAN_IP]:80. Just make sure the container is started and running properly first.

  13. Subby

    In case anyone else runs OMV under ESXi and has fun getting the pihole docker to start, you need to ensure that the vSwitch is set to allow promiscuous mode.

  14. Daniel

    Hi Again

    I dont know what its wrong, the container is running as healthy, but can’t connect to the pi admin page.

    I have set sudo docker network create -d macvlan -o parent=eth0 –subnet=192.168.1.0/24 –gateway=192.168.1.1 –ip-range=192.168.1.195/32 ph_network

    1. WunderTech

      What port are you using for the admin page? Are you appending that to the end of the URL?

  15. Daniel

    Can someone help me? Got the error:

    “PHP_ERROR_LOG” => “/var/log/lighttpd/error.log”,
    “ServerIP” => “192.168.1.16”,
    “VIRTUAL_HOST” => “192.168.1.16”,

    1. WunderTech

      Are there any other errors? Anything that’s not working that you can point out?

  16. Andy Yong

    Thank you for your tutorial. A couple of months ago I was successfully create a Pi-Hole based on your tutorial. I accidentally formatted the SD card so I’m trying to create one from scratch.

    I have an error when I click “Deploy the container”. The error is “Failure: No such image:pihole/pihole:latest”. Please advise.

    I used this command to create the ph_network:
    sudo docker network create -d macvlan -o parent=eth0 –subnet=192.168.29.0/24 –gateway=192.168.29.1 –ip-range=192.168.29.203/32 ph_network

    Thank you.

    1. WunderTech

      The network command looks fine, but Docker can’t find the image. can you check the image name to confirm that you didn’t accidently have a space in it or anything like that?

  17. Marco

    thanks for the tutorial, but I ran into an issue setting up the macvlan. When I try running the command, it says the following:

    Error response from daemon: invalid subinterface vlan name vethbcba219@if4, example formatting is eth0.10

    is there any workaround for this?

    1. WunderTech

      It sounds like the interface name that you’re using isn’t working. Can you confirm that that’s the correct network interface name and if it is, try and remove the @if4 and see if that makes a difference?

  18. Simon

    Thanks for the guide! Really helped me setting up PiHole on my OMV and getting used to Portainer. =)
    But if PiHole is the DHCP-server and the whole machine crashes (i.g. power outage) or reboots, the host-machine will not receive an IP from the DHCP. Therefore the host should get a fixed IP-adress.

    1. WunderTech

      I honestly am not sure what would happen in that situation, but I believe that it would depend on the DHCP lease expiration. I would think that it will still function properly, but could be something to test!

  19. Tom

    Hallo and thanks for the tutorial,

    I got a problem with step 9. I got an error on my command:

    sudo docker network create -d macvlan -o parent=enxb827eb36387e –subnet=192.168.178.0/24 –gateway=192.168.178.1 –ip-range=192.168.178.99 /32 ph_network

    “docker network create” requires exactly 1 argument.
    See ‘docker network create –help’.

    Usage: docker network create [OPTIONS] NETWORK

    Create a network

    What should I do?

    Thanks in advance!

    1. WunderTech

      For the subnet, gateway, ip-range, are you using two dashes (–)? It might be an issue on how the page renders, but it looks like an em-dash which can be causing the issue. Let me know and we can continue troubleshooting!

  20. Screwed101

    Hey there! Amazing tutorial, very easy to follow.

    I’ve got everything working (I think) but for one thing. I can’t seem to log in to my pi-hole page. It tells me I have the wrong password, but I’m certain that I’ve used the correct password. In fact, when I look at the container details and scroll down to the ENV table, I can see that I have “admin” listed beside “password” (right above “ServerIP” and “192.168.1.81”).

    I followed your guide to the letter, so I don’t know what I should do here, should I delete the container and start over? Can I edit what the password is? Any help would be great, thanks for your time!

    1. WunderTech

      By any chance, did you add the environment variable AFTER the container was created? If so, you will have to recreate the container as the password is set on initial install. Let me know and I will do my best to assist!

  21. Alex

    Thank you for this tutorial. Very clear and instructions!

    I typo’d in the network interface ID. If I just re-run the command line to create mcavlan with the correct ID, I get errors.
    * network with name pihole_network already exists so I changed network name
    then
    * Pool overlaps with other one on this address space so I changed the IP target address
    then
    * failed to allocate gateway (192.168.50.1): Address already in use

    not sure what to do now

    I’m OK to start over from the beginning if needed but not sure how to undo what I’ve already done in order to start over.

    TIA
    -Alex

    1. WunderTech

      Is 192.168.50.1 your gateway address? That would be the IP address of your DHCP server (generally, your router). Are you using the 192.168.50 subnet?

      Also, what is the IP address that you’re trying to assign the macvlan network interface? Would you be able to post the entire command you’re running?

      1. Alex

        yes 192.168.50.1 is the router (I think this is how Asus defaults their routers)

        here are my commands (and the error codes) I tried a few different ways to fix my initial typo on the network interface ID…

        pi@OpenMediaVault:~ $ sudo docker network create -d macvlan -o parent=eth0 –subnet=192.168.50.0/24 –gateway=192.168.50.1 –ip-range=192.168.50.249/32 pihole_network
        Error response from daemon: network with name pihole_network already exists

        pi@OpenMediaVault:~ $ sudo docker network create -d macvlan -o parent=eth0 –subnet=192.168.50.0/24 –gateway=192.168.50.1 –ip-range=192.168.50.249/32 pihole_docker
        Error response from daemon: Pool overlaps with other one on this address space

        pi@OpenMediaVault:~ $ sudo docker network create -d macvlan -o parent=eth0 –subnet=192.168.50.0/24 –gateway=192.168.50.1 –ip-range=192.168.50.240/32 pihole_docker
        Error response from daemon: failed to allocate gateway (192.168.50.1): Address already in use

        pi@OpenMediaVault:~ $ sudo docker network create -d macvlan -o parent=eth0 –subnet=192.168.50.0/24 –gateway=192.168.50.1 –ip-range=192.168.50.240/32 pihole_2
        Error response from daemon: failed to allocate gateway (192.168.50.1): Address already in use

        1. WunderTech

          Since you’re using OMV, can you open Portainer and delete all of the network interfaces that you created? I think that this issue is occurring because you’ve already created one and there’s a conflict.

          1. Alex

            That worked! Thanks again for the clear instructions.

            Will this automatically use the latest version of Pi-Hole? (will the image pihole/pihole:latest get updated?)
            If not, how can you run pihole -u for the containerized Pihole?

  22. Ernesto

    Hi,

    I have followed all the steps in your guide, however, when I try to deploy the container it gives an error: failure to create the macvlan: port or resource busy. I´ve checked the ip addresses from my router and the one selected (195) is free. Any idea what the problem is? I have also installed motioneye in my rpi, might that be the problem?

    1. WunderTech

      Is the macvlan creation successful? The macvlan should avoid any port conflicts that might appear, so it shouldn’t matter that you’re running another service, but I would try and make sure that Pi-Hole is properly using that macvlan network interface (it sounds like it’s not).

  23. Nessuno

    hi! thank you for the guide, when i create the macvlan
    –subnet=192.168.1.0/24 –gateway=192.168.1.1 –ip-range=192.168.1.195/32
    i must chose a subnet range outside the DHCP range in use of the local network ?

    like subnet=192.168.1.0/28

    i will have 14 Hosts
    HostMin: 192.168.1.1
    HostMax: 192.168.1.14

    and chose ip-range=192.168.1.6/32

    its correct?
    Regards

    1. WunderTech

      the /32 parameter is defining that one IP address, so you shouldn’t have to use an IP address outside of the DHCP range. Technically you can, but if Pi-Hole will be running 24/7, once it is assigned that IP address, DHCP shouldn’t hand it out to any other devices.

      1. Nessuno

        DHCP cant give that ip because i have chose a range outside of it
        right?

        Regards.

        1. WunderTech

          If you define an IP range in DHCP, it will only hand out addresses from that IP range. However, that doesn’t stop you from manually assigning an IP address outside of that range. It just stops DHCP from doing it.

  24. Thomas

    Thank you very much for this tutorial! I set it up and it works fine, as long as only IPv4 is concerned. Unfortunately i can not turn off IPv6 in my DSL router so i have enable IPv6 in PI Hole somehow. Do you know how to achieve it?
    I tried to follow the instructions here: https://gist.github.com/zottelbeyer/c47b1a48b9c5c69796a712466e7fb71f
    but i fail in line 21 of the script.
    Any help would be greatly appreciated. Thank you in advance!

    1. WunderTech

      When you say that you can’t turn it off, does that mean that the system is automatically trying to use IPv6? Is there any way that you can try and force it to use IPv4 first?

      1. Thomas

        I found the solution myself: The problem was related to the used DSL router (Speedport Smart 2 provided by Deutsche Telekom). You have to enable the UAL option for IPv6 for the internal network. Afterwards, the internal IPv6 address of the DSL router is visible and can be used in a macvlan device in portainer. That solved the problem for me. Now Pi hole works for both IPv4 + IPv6 addresses 😉

        1. WunderTech

          Awesome news! Glad to hear you got it working.

  25. charis

    it works! thanks a lot

  26. Petr

    Love the work – easy instructions and works! Any plans to have the same for Lychee?

    1. WunderTech

      Thank you! I will certainly look into that!

  27. ehro

    Thank you so much for your quick reply!. You were totally right, the Raspberry’s wlan0 doesn’t support macvlan. So, I changed to a bridge network as recommended and everything worked as expected. In my case, instead of using port 8080 in the container I used it in the OMV web interface.

    Just one thing to keep in mind though, if the idea is to use the PiHole’s DHCP server, the bridge network doesn’t work out of the box for this purpose, mainly because the dnsmasq won’t be able to assign an IP address from a range that doesn’t contain the bridge Network IP address. Due to that, I decided to use the ethernet interface in my Raspberry Pi and follow all your instructions in order to implement mcvlan, after that everything worked smoothly!, so now I have OMV5, PiHole, and a DHCP server running in my Raspberry

    Again, thank you so much for your help and for such a good tutorial!.

    1. WunderTech

      I’m happy to hear that you were able to resolve it! Thanks so much for the added info as well! It’s great for anyone interested in setting up DHCP!

  28. charis

    Hello there I faced same problem even I used eth0 interface.

    1. WunderTech

      Hello! What is the exact issue that you’re facing? I couldn’t find where this comment was replied to.

      1. Charis

        Hello again, My issue is that I beside during installation everything looks to go ok, at the end I I type my ip into the browser and I can’t reach my pi hole web page. I use eth0.
        By the way why the mask of macvlan last IP is /32?

        1. WunderTech

          Is the container running properly? Also, if you’re using the macvlan network, are you trying to connect to that IP address or the IP address of OMV? It should be the IP address of the macvlan network interface.

          Let me know and we can continue troubleshooting!

      2. charis

        This is the message from my logs:

        [s6-init] ensuring user provided files have correct perms…exited 0.
        [fix-attrs.d] applying ownership & permissions fixes…
        [fix-attrs.d] 01-resolver-resolv: applying…
        [fix-attrs.d] 01-resolver-resolv: exited 0.
        [fix-attrs.d] done.
        [cont-init.d] executing container initialization scripts…
        [cont-init.d] 20-start.sh: executing…
        ::: Starting docker specific checks & setup for docker pihole/pihole

        1. WunderTech

          Is the container “running” or is it stating that it’s “unhealthy”?

          1. charis

            it is healthy no running. I use macnlan and I try to connect to into that IP address, not the IP of OMV.
            Can i find you in any social net?

          2. charis

            try again from the begging. Now container stuck in starting phase.
            output from log:
            ::: Starting docker specific checks & setup for docker pihole/pihole,
            [i] Update local cache of available packages…
            [✓] Update local cache of available packages,
            [✗] Aborting installation: iproute2 and iproute packages were not found in APT repository.

            I insist into your way, despite I found many out there since is the easiest and the most update among all the others

          3. WunderTech

            That appears like it could be a DNS issue. Can you create a file named “resolv.conf” with the data below?

            nameserver 127.0.0.1
            nameserver 8.8.8.8

            Then, mount that file to the file directory “/etc/resolv.conf”. You might have to recreate the container, but I’m thinking that will work. Let me know how it goes!

          4. charis

            it works finally, if i can understand well something went wrong during pulling or installing of container.

          5. WunderTech

            That’s awesome! Glad to hear!!

  29. ehro

    Hi There!, Thank you very much for this tutorial it has been great. After I followed the instructions, my Pi-Hole container is running (healthy, actually), but the problem is that I can’t connect to the PI-Hole web interface and when I connect to the Pi-hole console, I can’t ping any other IP within my network. The only difference I’ve found in my configuration is that I’m using the raspberrypi’s wlan0 interface, but apart from that everything seems to be the same. Can you please help me to try to find the solution for this problem?.

    1. WunderTech

      The issue unfortunately is that you’re most likely using the wlan0 network. In order to use a macvlan network interface, you have to have a network interface that supports it, and I’m not sure wireless interfaces support is.

      One option would be to use the default bridge network (don’t use the macvlan) and map container port 80 to something not in use (8080 for example). Then, when you have to access the web admin console, you would use your OMV IP address and port 8080. Everything else should work the same!

      Let me know if I can clarify anything!

  30. Balaji Pooruli

    I looked at those also. I am planning to get rid of adguard home, delete the ag_network and try this. I will keep you posted on this.

  31. Sachith

    I am unable to login to Pi hole, showing wrong password even though its correct. Need Help

    1. WunderTech

      When you created the container, did you add the Environment variable before the container installed? I believe that if you add it afterwards, it won’t work properly. Let me know and we can continue troubleshooting!

  32. Balaji Pooruli

    Thanks for your response.

    No, I was using 192.168.1.10 for ag_network and I am trying to use 192.168.1.11 for ph_network and I get this error.

    1. WunderTech

      Is anything else on your network using that IP address? DHCP hands out IP addresses, so there’s a good chance that there’s another device on your network using that IP address.

      1. Balaji Pooruli

        I checked my router’s IP allocation list and confirmed that 192.168.1.11 is not reserved for any devices before running the docker network command.

        1. WunderTech

          Did you check the devices that are currently connected? It doesn’t have to be reserved for the address to be handed to a different device by DHCP (phone, IoT device, etc).

  33. Balaji Pooruli

    I tried this, however I am not able to proceed. When I run the “docker create network” command, I get the below error message.

    “Error response from daemon: failed to allocate gateway (192.168.1.1): Address already in use”

    Any ideas?

    FYI, I did setup Adguard home on a docker container in my raspberry PI 4. While doing so, I did setup the ag_network using the “docker create network” command. I am not sure if this is causing a conflict.

    Can you please help?

    1. WunderTech

      That error points to you using the same IP address that you’re using somewhere else. This is where the IP address is set: –ip-range=192.168.1.195/32

      Can you change the “.195” to something else (not in use) and retry?

      Let me know and we can continue troubleshooting!

  34. Rodrigo

    Thanks for your guide!
    When i try to deploy the container, Portainer just shows me a “failed to create the macvlan port: operation not supported” message.
    Can you help me?

    1. WunderTech

      A few questions that I’m hoping we can use to further troubleshoot:

      1. When you ran the “macvlan” create command, did you substitute the correct network interface name?
      2. What device are you running OpenMediaVault on? Technically, the network interface needs to support “promiscuous mode” which certain devices do, and certain do not.

      Let me know and we can continue troubleshooting!

  35. Peter

    Nice guide, works like a charm. 2 questions: 1. on admin page, on top it states hostname: a624c16e06d1 in red – is this some kind of error? and 2. how should I update ? (I fear of breaking things!)

    1. WunderTech

      Yes, that’s fine! That is the internal ID of the container. If you edit the container and go to “Network”, you should see “Hostname”. Give it the hostname you want, save it, restart and you should be good!

      Let me know if you have any trouble!

  36. Theron

    Thanks for posting this. I tried a couple of other tutorials and they all seem to make it more complicated than it needs to be. I’m not sure I understand the IP addresses you put in for your DNS settings at the end, though: “I point my routers DNS servers to my Pi-hole server as I want to ensure every device connects to it.”, but then you put in .197 and .198 instead of .195.

    1. WunderTech

      That is my fault! I was in the process of moving and had already disconnected my router so I couldn’t get a new screenshot. That is an old screenshot that I used for a different tutorial. You are correct in stating that .195 is all that you should use (unless you have another Pi-Hole DNS Server). Sorry for the confusion!

  37. el_Salmon

    Hi, I have follow your steps and it works like a charm. Just one thing: I have added TZ=’Europe/Berlin’ and DNS1=127.0.0.1 and DNS2= to the ENV variables, because it seems is recommeded.

    1. WunderTech

      Thanks for sharing and thank you for reading the tutorial!

  38. WunderTech

    Did you add the “ServerIP” environment variable and change it to be the macvlan network interfaces IP address?

    Let me know and we can continue troubleshooting!

  39. KP

    Hi
    When I follow this guide i get this in the logs and can’t access my pi-hole:
    Added ENV to php:
    “PHP_ERROR_LOG” => “/var/log/lighttpd/error.log”,
    “ServerIP” => “0.0.0.0”,
    “VIRTUAL_HOST” => “0.0.0.0”

Leave a Reply