In this tutorial, we’ll look at how to set up an FTP/SFTP Server on a Synology NAS.
FTP (File Transfer Protocol) allows you to transfer files from one host to another. In general, an FTP server will allow you to host files that other users can download with an FTP client. In this tutorial, we’ll be utilizing SFTP, which is a secure version of the traditional FTP protocol.
Please keep in mind that in order to access your FTP server, you’ll have to utilize port forwarding with a DDNS hostname.
FTP vs. SFTP on a Synology NAS
Before we look at how to set up an FTP/SFTP server on a Synology NAS, you need to understand the two main options available.
First, a plain old FTP server does not utilize any form of encryption meaning everything is sent in plain text. For this reason, you do not want to use this. While you can use it, it’s not something I’d recommend.
At a minimum, you should use SFTP (SSH File Transfer Protocol), which adds encryption to the FTP protocol. There is even an FTPS option you can use (that this tutorial will not cover).
To be entirely clear, FTP is not secure because it doesn’t utilize encryption so your credentials (username/password) will be sent in plain text.
For this reason, you should utilize SFTP at a minimum to ensure the credentials are encrypted, which is why the steps below will only show how to configure an SFTP server.
Configuring an SFTP Server on a Synology NAS
In order to configure the SFTP server on a Synology NAS, follow the steps below.
1. Open the Control Panel, select File Services, then FTP. Scroll down to SFTP and Enable SFTP Server. Change the port to something different than 22 (security through obscurity by changing the default port). After making the changes, select Apply.
NOTE: I’ll be using Port 2222, but you can use anything not currently in use.

Firewall / Port Forwarding for SFTP
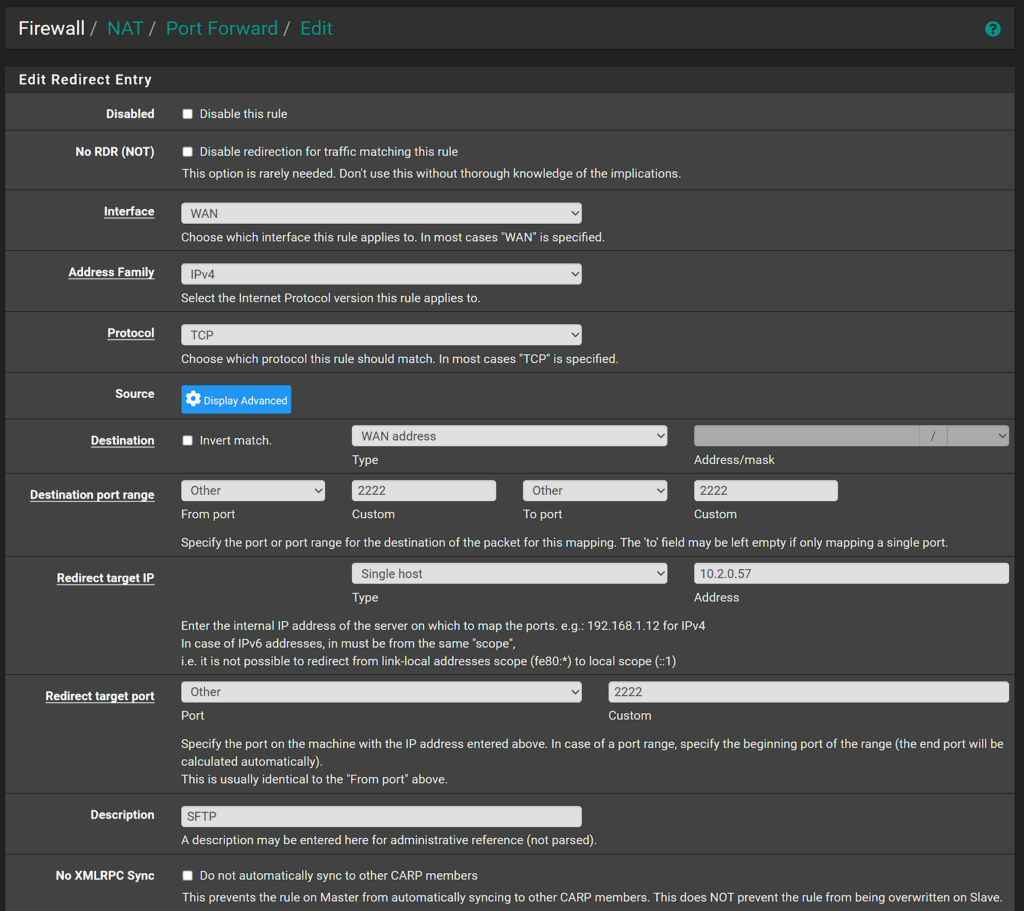
The SFTP settings are configured, but you now need to port forward TCP Port 2222 (or whatever you’re using). Please keep in mind that you also must configure DDNS to ensure that you’re able to access your external IP address from an outside location.
We also must configure the Synology Firewall to allow connections to the SFTP port specified above (if you’re using the Synology Firewall).
In the Control Panel, select Security, then Firewall, and create a new rule for TCP Port 2222 (or whatever port you specified above). This is only necessary if you’re using Synology’s Firewall.

On your router, create a new port forwarding rule for TCP Port 2222 (or whatever port you specified above). An example port forwarding rule is shown below, using pfSense.

After the firewall and port forwarding rules have been created, you can move on to the user account section.
User Account for SFTP
Since SFTP is a file transfer protocol, you’re most likely sending files to a user who doesn’t traditionally have access to your NAS. In this case, it’s important to create a separate user account and ensure they have access to only the shared folders that they need to access.
1. Open the Control Panel, select User & Group, then Create. Enter the information, then ensure that you select No Access on all folders that you do not want the user to access.
Then, either select Read/Write or Read Only depending on the permission the user should have to the shared folders that you do want them to access.

2. In the Applications section, Deny All permission except for SFTP.

3. Create the user and move to the next step to test!
Testing the SFTP Connection
Now that the SFTP server has been configured, you can test the connection. FileZilla is one of the most popular FTP clients you can use, so that’s what we’ll use below.
Please note that you can test this locally if you’d like before testing it over the internet.
1. Enter in your Host (DDNS Hostname), the FTP User created, as well as the Password, and the Port.

2. After connecting, you should see the folders listed in the Remote Site! You can now view the files that you have permission to!

Conclusion: How to Set Up an FTP/SFTP Server on a Synology NAS
For the most part, utilizing an SFTP server isn’t done as frequently as it once was since you can utilize various tools like Synology Drive through services like Synology QuickConnect and avoid port forwarding. However, there are cases where an SFTP server is helpful, and in cases like that, this is the way to configure it.
Thanks for checking out the tutorial on how to set up an FTP/SFTP Server on a Synology NAS. If you have any questions on how to set up an FTP/SFTP Server on a Synology NAS, please leave them in the comments!


