In this tutorial, we’re going to look at how to create firewall rules in pfSense.
When you set up pfSense and configure all of your interfaces, you must create firewall rules. A firewall rule will allow or deny traffic based on the source of where that traffic is coming from. There are many ways that you can implement firewall rules in pfSense, and understanding how they work is an important step in ensuring your network is configured properly.
There’s a great article from Netgate that explains how rules are processed and I suggest you read and understand it before looking at how to create firewall rules in pfSense.
1. How to Create Firewall Rules in pfSense
When you would like to create firewall rules in pfSense, the rules must be configured on each interface (unless you’re using a floating firewall rule, which is explained at a later step). This means that if you have LAN, IoT, and Guest networks, firewall rules will have to be created on each interface to allow or deny traffic. You also must create firewall rules if you’re using a VPN like OpenVPN or WireGuard (on the VPN interface).
Rules are created for each interface in the inbound direction only. That doesn’t mean that outbound traffic can’t be blocked, but the traffic must originate in the inbound direction for the interface. An example is explained later in this tutorial.
It’s also important to understand that by default, traffic is automatically denied. In order to allow traffic on an interface, an allow rule must first be created.
1.1 How to Access the Firewall Rules in pfSense
1. If you’d like to configure firewall rules, you can access the rules section by navigating to Firewall, then Rules.

2. After navigating to the rules, you’ll see all of the interfaces currently in pfSense as well as a floating tab which will be explained later.

3. If you create rules for the WAN interface, you’ll be creating rules to allow traffic into your local network from external networks. If you are using port forwarding in pfSense, you must ensure that a firewall rule exists on the WAN interface for the same port that was forwarded.

4. Any other interfaces listed (other than the floating section) will manage traffic for internal interfaces or for another category (VPNs, for example).

1.2 Creating Firewall Rules
1. To create a firewall rule in pfSense, navigate to the interface where you’d like to create the rule and select Add. The up arrow will create a rule at the top of the list, and the down arrow will create one at the bottom.

2. Select in the Action tab if you’d like traffic to be permitted (pass), blocked, or rejected.

3. Update the interface if required, then change the address family to either IPv4, IPv6, or IPv4 + IPv6.

4. In the protocol section, select the correct protocol for the rule that you’d like to create. If you want to permit or deny all traffic, select any.
Based on the protocol that you select, different options will appear below it. For example, if you select TCP, you’ll have to specify the TCP port range.

5. In the source section, select the correct category.
If you’d like to pick an entire network (LAN, IoT, Guest, etc), select the “interface name + net”. This will use the entire network.

6. In the destination section, select the correct option (same as the source section).

7. Give the rule a description and save.

1.3 Example Firewall Rule
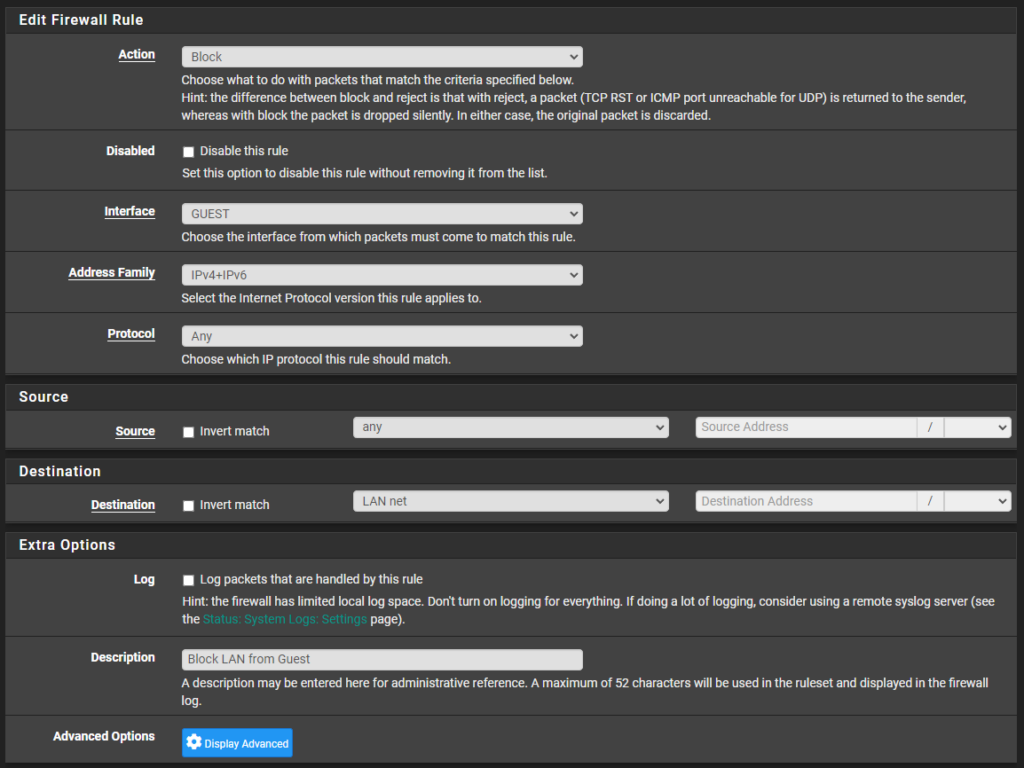
I’ll list an example firewall rule below that blocks traffic from my guest network to my LAN network. This means that anyone connected to my guest network will not be able to access anything on my LAN network.
- Action: Block
- Interface: GUEST
- Address Family: IPv4 + IPv6
- Protocol: Any
- Source: Any
- Destination: LAN net
- Description: Block LAN from Guest

This rule blocks any traffic from the guest network to the LAN network for IPv4 and IPv6 traffic. On the LAN network interface, a rule can be created as well to block traffic from the LAN network to the guest network if you don’t want any traffic passing to/from the Guest and LAN networks.
I want to be clear that the initial rule is created on the Guest network interface because rules are created on the interface level for inbound traffic only. Traffic is blocked to the LAN network because a guest device attempts to connect to a LAN device and pfSense blocks it.
Guest Network Device > Requests LAN Network > pfSense Firewall > Block Rule
1.3 Floating Firewall Rules
There are a few precautions that you should follow if you use floating firewall rules, but they’re a valuable tool. Floating firewall rules apply to multiple interfaces and are processed first when a request hits pfSense. You must keep this in mind because if traffic is blocked from a floating rule, it will never make it to the interface rules.
The main benefit of using floating firewall rules is that you can block or permit traffic for all interfaces with an individual rule. For example, if you want to allow DNS traffic (port 53), you can create an allow rule inside of the floating section, and traffic on port 53 will be permitted for all interfaces.
This is a powerful option, but please be careful as you’re technically managing all interfaces with a single rule.
2. Conclusion & Final Thoughts: pfSense Firewall Rules
This tutorial looked at how to create firewall rules in pfSense. After you set up pfSense and start configuring it, the firewall will become extremely important as it will determine which traffic should be permitted/blocked. Without firewall rules, all traffic is blocked by default, so at minimum, you must create allow rules for traffic that should be permitted.
Thanks for checking out the tutorial on how to create firewall rules in pfSense. If you have any questions on how to create firewall rules in pfSense, please leave them in the comments!


