Creating an efficient and reliable Wi-Fi network requires planning, configuration, and ongoing optimization. Fortunately, UniFi networks are designed with ease of use in mind, so the settings offered are minimal but have a tremendous impact. In this article, we’re going to look at how to optimize a UniFi Wi-Fi Network to ensure you get the best overall performance!
Video Tutorial on Optimizing a UniFi Wi-Fi Network
Watch our step-by-step video tutorial on how to optimize a UniFi Wi-Fi Network. We’ve embedded our full YouTube walkthrough below, which goes over the entire process with an explanation of each section.
How to Optimize a UniFi Wi-Fi Network
There are multiple steps required on the planning side to ensure you follow the correct steps before looking at any UniFi Wi-Fi optimization steps. We’ll start with planning, and then look at SSID and AP settings.
Planning Your Wi-Fi Deployment with UniFi Design Center
Before configuring any settings for UniFi Wi-Fi Optimization, it’s important to plan your Wi-Fi layout. The easiest way to do this is with the UniFi Design Center. By using this, you’re able to upload the floor plan where you live, add in your devices, and see the exact performance you’ll receive based on where you add the access points.
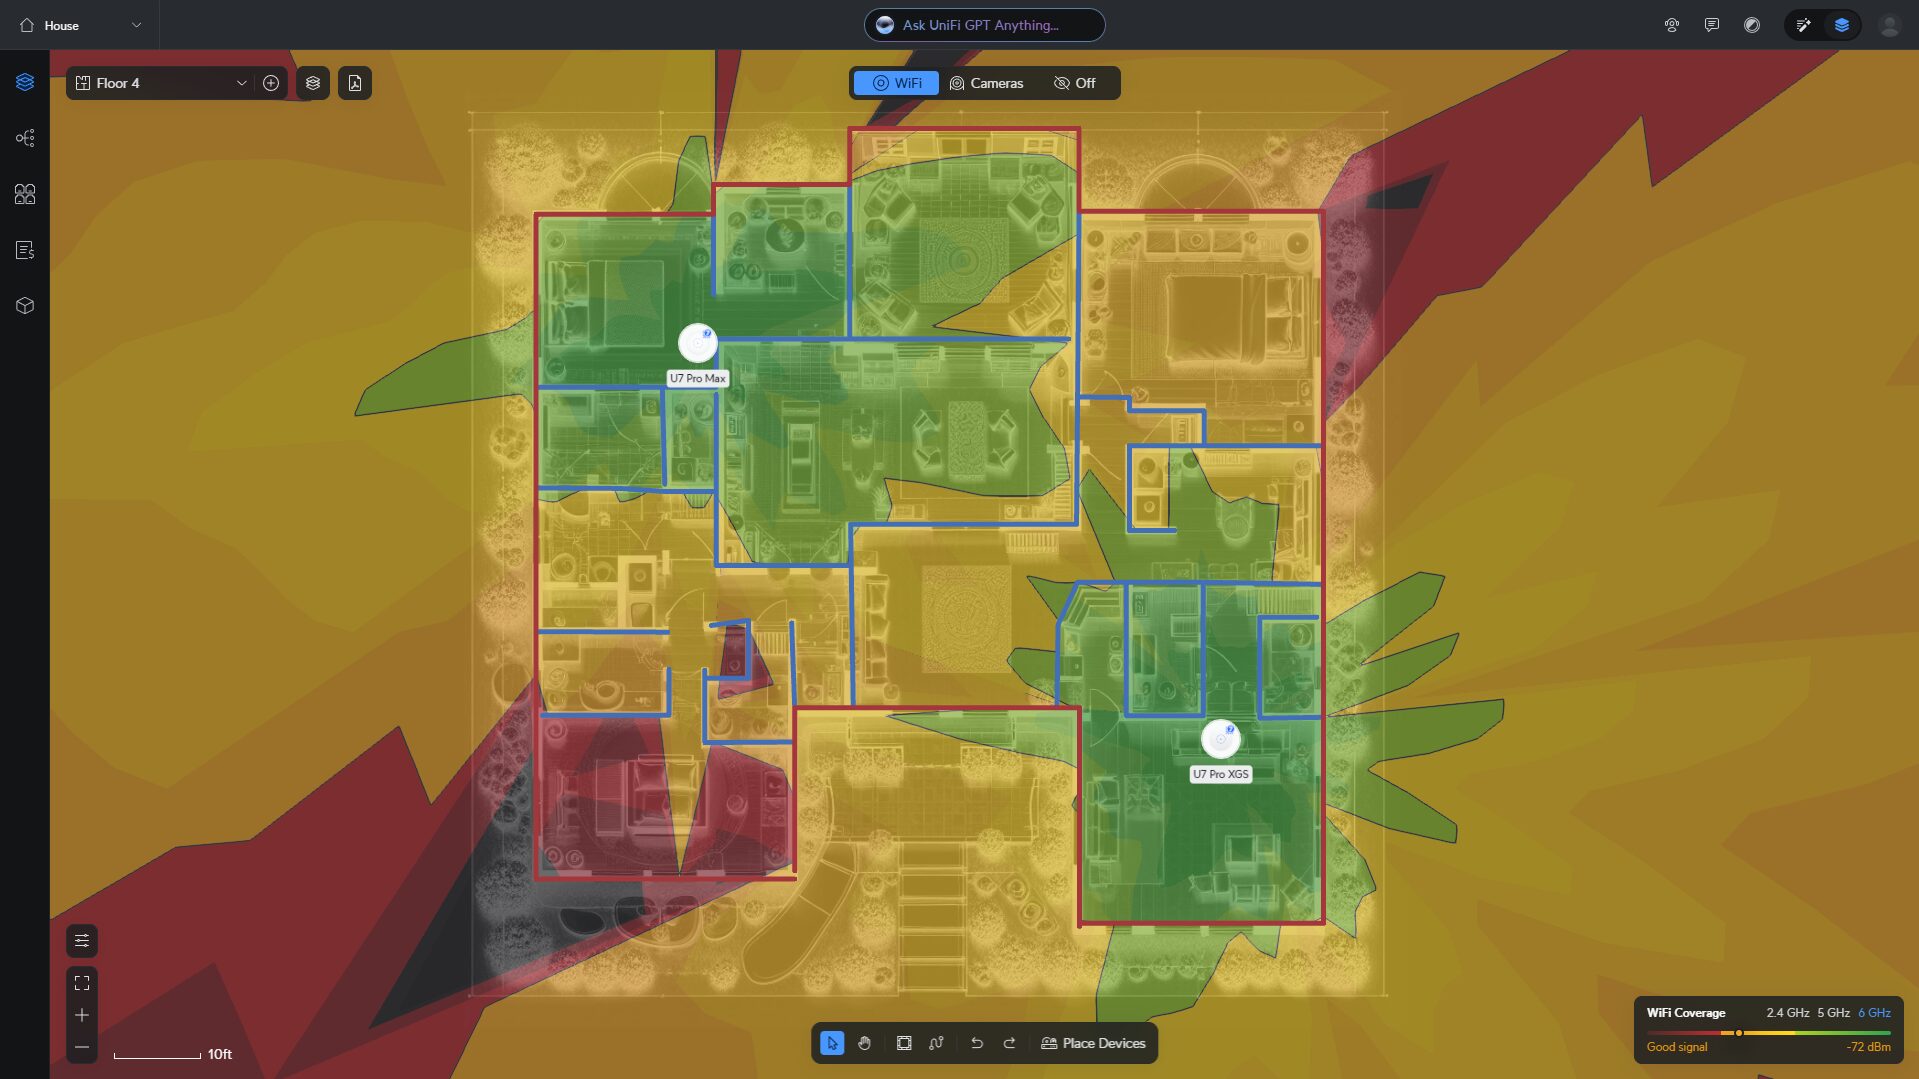
After uploading your floor plan, add your devices and move them around. Depending on exactly what devices you have and the layout of your location, purchasing additional access points or even moving them to more optimal locations will become clear. Make sure you check for all Wi-Fi bands (2.4GHz, 5GHz, 6GHz).
Our goal with this is to ensure that our devices will roam from access point to access point as efficiently as possible.
SSID Configuration Strategy: Optimize your UniFi Wi-Fi Network
If you don’t already have a segregated network with multiple VLANs, it’s the first step you should take before optimizing your UniFi Wi-Fi network. When you segment your network (check out our complete UniFi setup guide on YouTube to learn how), you can configure your Wi-Fi SSIDs to have different settings. These settings can help with roaming and performance, or even give you flexibility.
Not only that, but certain devices (IoT devices, for example) operate better on different Wi-Fi bands, so while your cell phones and PCs might use the 5GHz or 6GHz Wi-Fi bands, your IoT devices might only support 2.4GHz. So in summary, make sure you create multiple Wi-Fi SSIDs, and then you can configure a few of these additional settings which will improve client performance and reliability.

This is available when you’re using WPA2 security only. This allows a single SSID to direct devices to different VLANs based on the password entered. Overall, one SSID with different passwords for different VLANs.
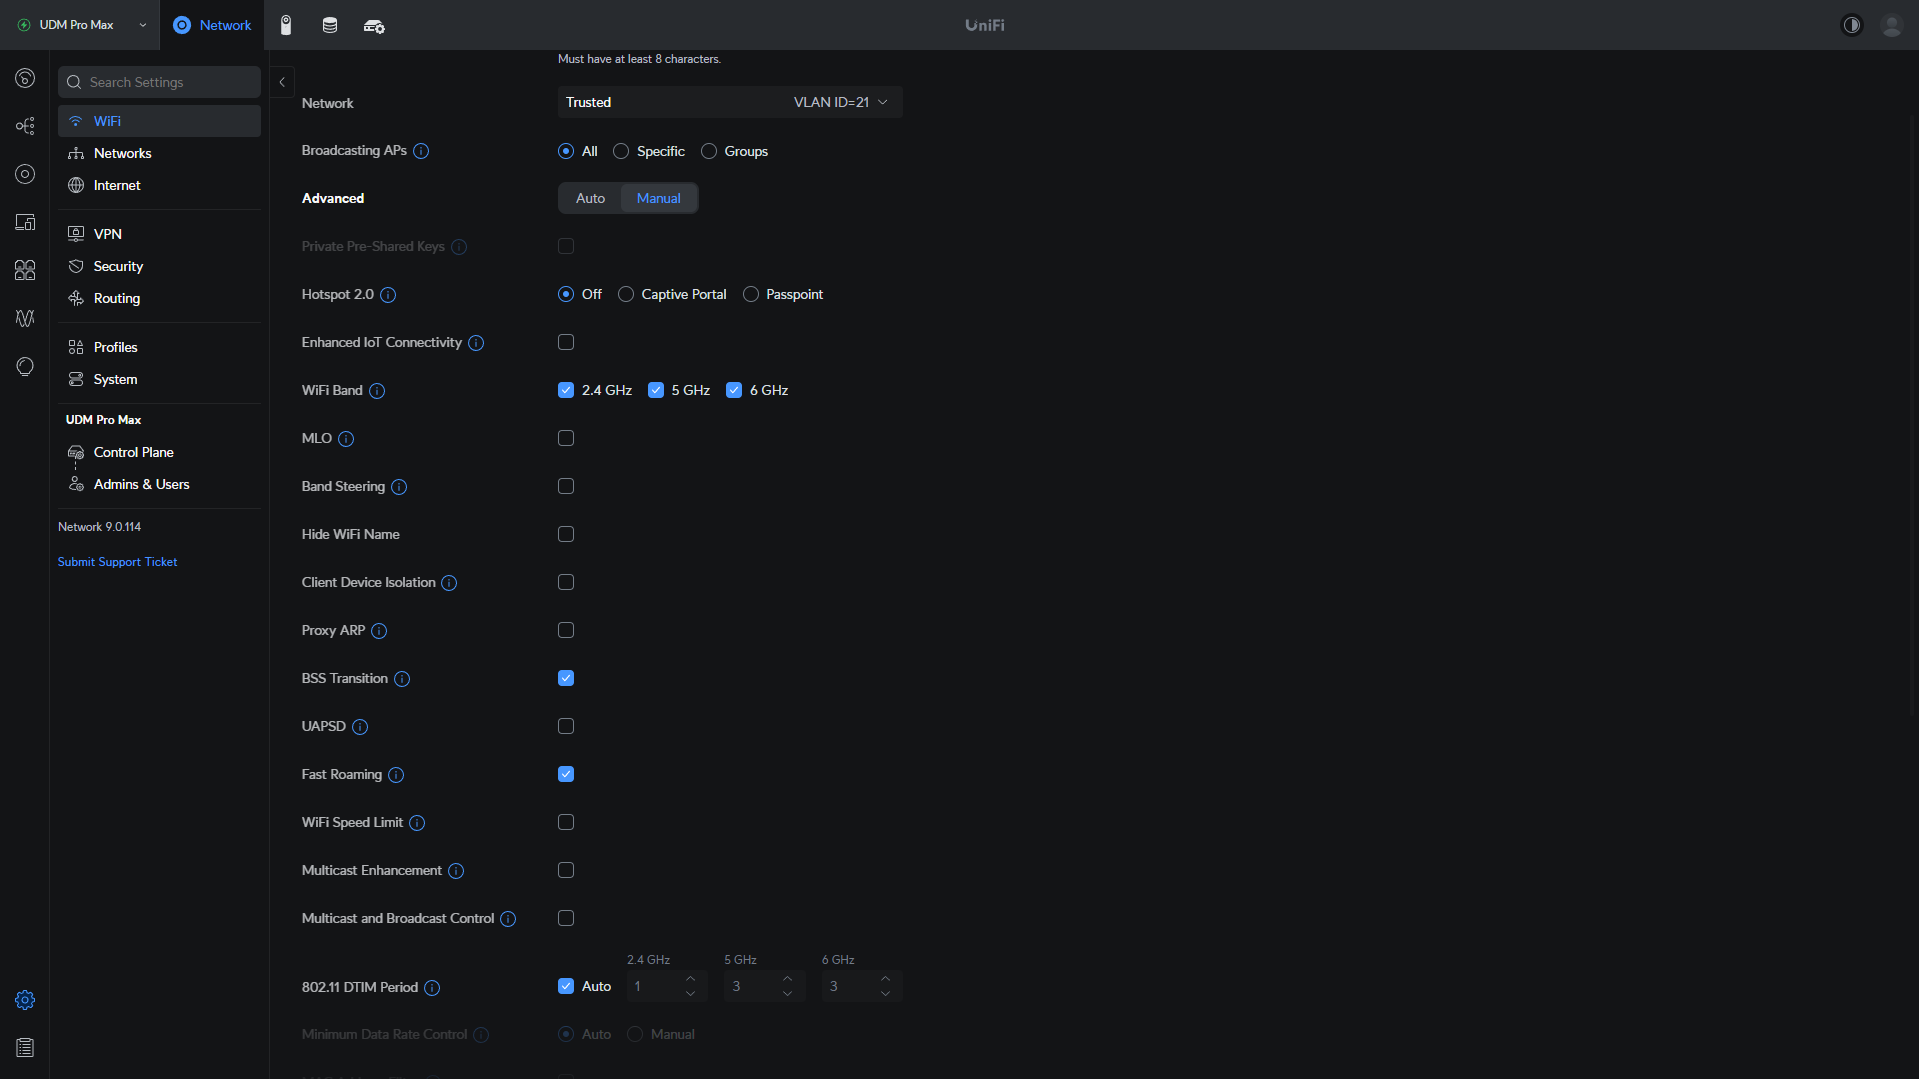
Band Steering
Nudge (you cannot force) devices to connect to the 5GHz Wi-Fi band instead of the 2.4GHz Wi-Fi band.
Multi-Link Operation (MLO)
Enables simultaneous connections across multiple frequency bands, and is a Wi-Fi 7 feature. Currently in early access, but will improve throughput and connection stability.
For now, I’d recommend leaving this off, but it’s a feature you’ll almost certainly use in the future.
BSS Transition and Fast Roaming
These settings significantly impact roaming performance, which we’ll discuss later in the article.
Access Point Configuration
Now that we looked at the SSID changes, we can start to configure each access point.
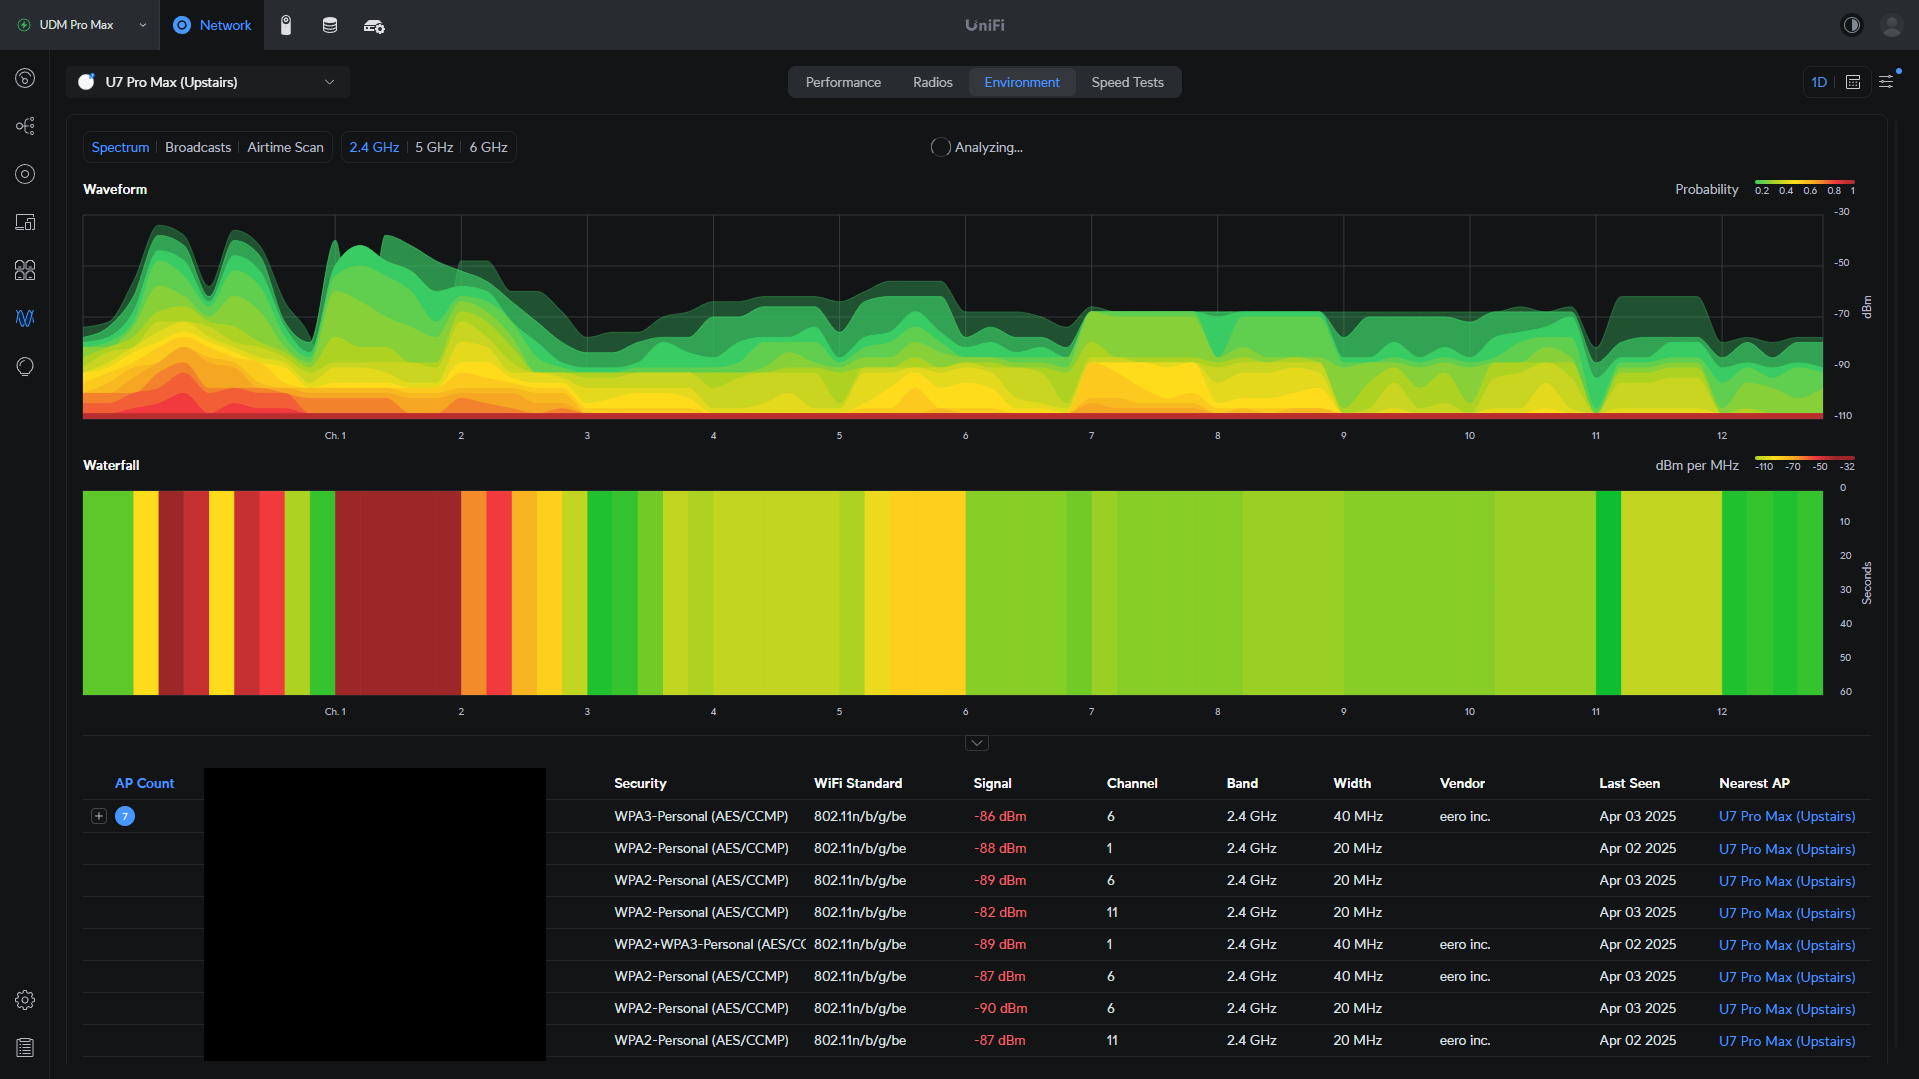
Radio Environment Analysis & Channel Selection
Before adjusting specific settings, analyze your radio environment to determine the best channel(s) to use. You can use real-time spectral analysis (if your AP supports it – radios > environment > select the AP > spectrum):
Or you can perform an airtime scan (radios > environment > select the AP > airtime scan):
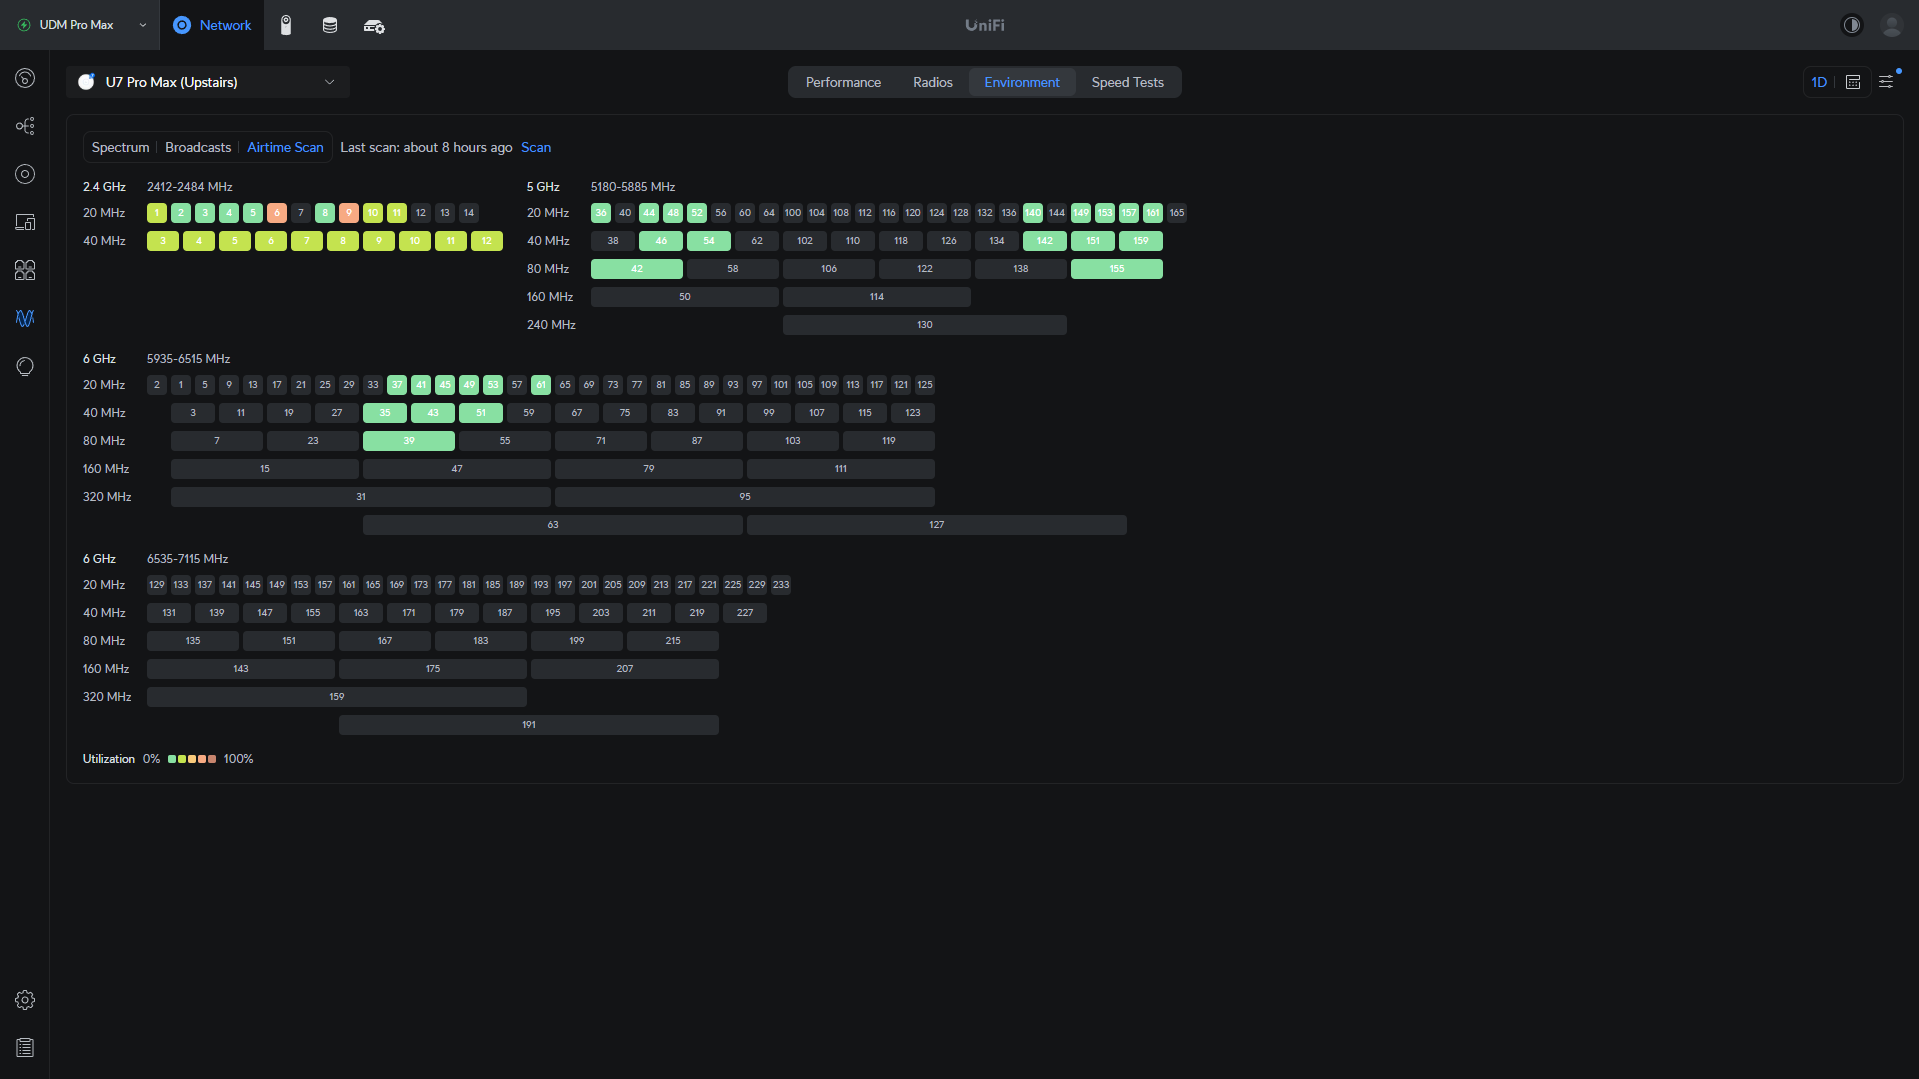
Based on the results above, you have two main options for UniFi Wi-Fi optimization:
- You can manually set each access point to use a specific channel, which will ensure each AP operates (depending on how many you have) on different channels.
- You can use auto, which will select the best channel when the access point starts up.
NOTE: For the 2.4GHz band, if you want to set a manual channel, only use channel 1, 6, or 11. These are non-overlapping channels.
Nightly Channel Optimization
The settings above are either set manually (specific channel(s)) or automatically at AP startup. These are settings on the APs themselves, but in the Wi-Fi section, the Channelization section will automatically optimize the APs daily at a specific time. This is designed to select the best channel per access point, per band, when the process runs.
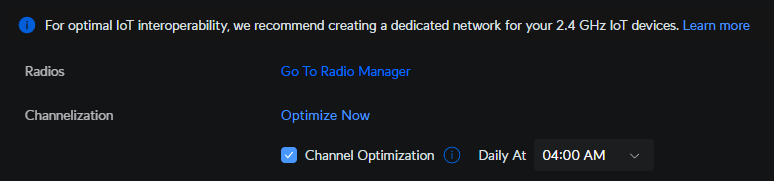
If you’re manually setting the channels based on the environment, you should turn this off. This can potentially change the channel, which is what you’re trying to avoid.
Alternatively, if you’re using the auto channel selection at AP startup, I’d suggest keeping this on so the process runs nightly to optimize your channels.
The only downside of running the scan at 4 AM is that’s when the majority of usage/interference is low, but running this during waking hours might disrupt Wi-Fi connectivity, so select the best time based on your requirements.
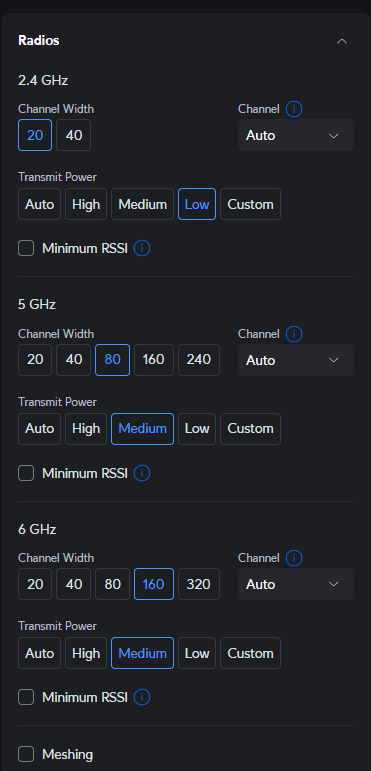
Channel Width
The channel width directly impacts the performance and potential interference. Here are some general guidelines:
- 2.4 GHz
- Use the 20MHz channel width. Using more than this will most likely add interference.
- 5 GHz
- For a default setup, use 40MHz. If you want faster overall performance (and the interference around you is minimal), 80MHz should be fine, but monitor for interference and adjust if required.
- 6 GHz
- For a default setup, use 80MHz. If you want faster overall performance and the interference around you is minimal (which, for now, it should be with 6GHz), 160MHz has worked very well for me.
The important thing to understand is that a wider channel width will provide better overall performance, but will also provide more overall interference, so these settings are highly based on your environment.
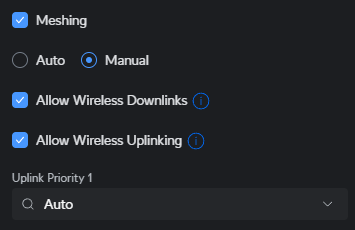
Meshing Configuration
If you’re currently using meshing (access points connected to other access points over Wi-Fi), you can leave meshing on. If all of your APs are hardwired, you can safely disable this.
If you do use meshing and only want it on for certain APs, you can change this on each access point to optimize your setup. You can also modify a few other settings to optimize the setup further (uplink, downlink, etc).
Transmit Power Settings
Depending on the total number of access points you have, leaving the transmit power at high or auto isn’t necessarily ideal.
Here’s a breakdown of exactly why that isn’t optimal. When you have two access points that are close to each other, the goal is to ensure the connection is weak on one access point while close to another. Without this, the AP can become sticky and hold a connection from a further AP rather than roaming to a closer AP.

So how exactly do we get around this? We adjust the transmit power. This ensures that as you move further from one access point and closer to another, the connection will be weak on the further access point, while strong on the closer access point.

Depending on how many access points you have, you may use higher or lower transmit power, but for most, these are the settings that I found worked well for me:
- For the 2.4GHz band, I use a low transmit power.
- For the 5GHz band, I use a medium transmit power.
- For the 6GHz band, I use a high or medium transmit power (currently testing to see which option is best).
The only exception to these rules is if you only have one access point. If you do, you want to keep the transmit power high so the connection is maintained for as long as possible.

Based on your environment, adjust the transmit power for each access point. Remember, each AP can have different settings, so depending on their location, you might use slightly different transmit power settings.
Roaming Challenges
Client devices (not access points) make roaming decisions. The only thing we can really do is nudge the client device to move to a different access point. Without this, clients often stick to further access points rather than roaming quickly. There are a few settings we can optimize to make this process better (depending on your devices).
Fast Roaming (802.11r)
Fast roaming dramatically reduces the time needed for handoffs by pre-authenticating clients with other APs. This speeds up the process, but requires a device that supports 802.11r…which isn’t new, but you’d be surprised at how many devices still don’t support it.
This is why a segregated network is so important, because if you have a VLAN with newer devices, this is a great feature to turn on. This has drastically improved my Wi-Fi roaming experience. If you don’t, be careful, as this can cause connection issues.
BSS Transition
This is on by default, and improves transitions as well. This is generally safer (in my experience) to leave on than Fast Roaming, but if you experience connectivity issues, you might want to disable this.
Troubleshooting Common Issues
Here are some common issues you’ll experience when optimizing your UniFi Wi-Fi Network, and how you can fix them.
Poor Roaming Performance
If devices aren’t transitioning properly between APs:
- Reduce transmit power on APs
- Verify fast roaming is enabled for the SSID (if client devices support it)
Interference Problems
If you notice sudden performance degradation on one or more access points:
- Run a new RF environment scan (spectral or airtime)
- Look for new sources of interference
- If you manually set the channel, adjust it to a channel with less interference. If you are using auto, run the channelization optimization (settings > WiFi)
- Adjust channel width if necessary (dropping from 80 MHz to 40 MHz, etc)
Connectivity Issues After Configuration Changes
If devices struggle to connect after making changes, check the last thing you did. We aren’t adjusting that much here that can cause massive issues, but some of these settings can impact performance or connectivity. Make each to change, test, and validate that it works as expected, then move on to the next change. If you make all of the changes at the same time, you might not be sure what is causing issues.
Conclusion on UniFi WiFi Optimization
These are guidelines you can follow that should provide a solid foundation and optimize your UniFi Wi-Fi network. As always, you’ll have to monitor and adjust these settings based on your experiences, and ongoing maintenance in this area may be required, but if you carefully implement these settings, you should see a big improvement.