In this tutorial, we will look at how to set up a DMZ in pfSense.
Before we look at how to set up a DMZ in pfSense, I wanted to summarize exactly what a DMZ is. A DMZ (demilitarized zone) network is a subnetwork that is used to expose external-facing services. The goal of this subnetwork is to expose it to untrusted networks and block access to local (trusted) subnets. This allows untrusted devices to communicate with the DMZ subnet, but they will have no communication with local (trusted) subnets/devices.
The setup on pfSense is similar to setting up any other subnetwork, but it’s important to ensure that you configure the correct firewall rules so that the DMZ devices cannot communicate with LAN, IOT, or any other local subnets.
How to Set Up a DMZ in pfSense
We will look at how to set up a DMZ in pfSense below, but before we move forward, I want to point out something extremely important.
It’s best to separate the DMZ network on its own physical switch(es) if possible. This means that a physical pfSense port will be dedicated to the DMZ network and that will be connected to a Switch that will only have DMZ devices on it. That’s assuming that cost is no concern and you’re physically capable of managing two sets of infrastructure.
Anything outside of the above is considered “risky” in some way, meaning that you’re either sharing hardware with other, non-DMZ devices, or you’re using the same logical infrastructure (in the case of a VLAN) and separating it by firewall rules.
Business or personal requirements ultimately determine which approach is best, but I wanted to at least give a little context on the differences. We’ll now look at how to set up a DMZ in pfSense.
1. Log in to pfSense and select Interfaces, then Assignments.

2. Select the physical interface that you’d like to configure the DMZ on, then select Add.

3. After the interface has been added, select the Name to edit the interface.

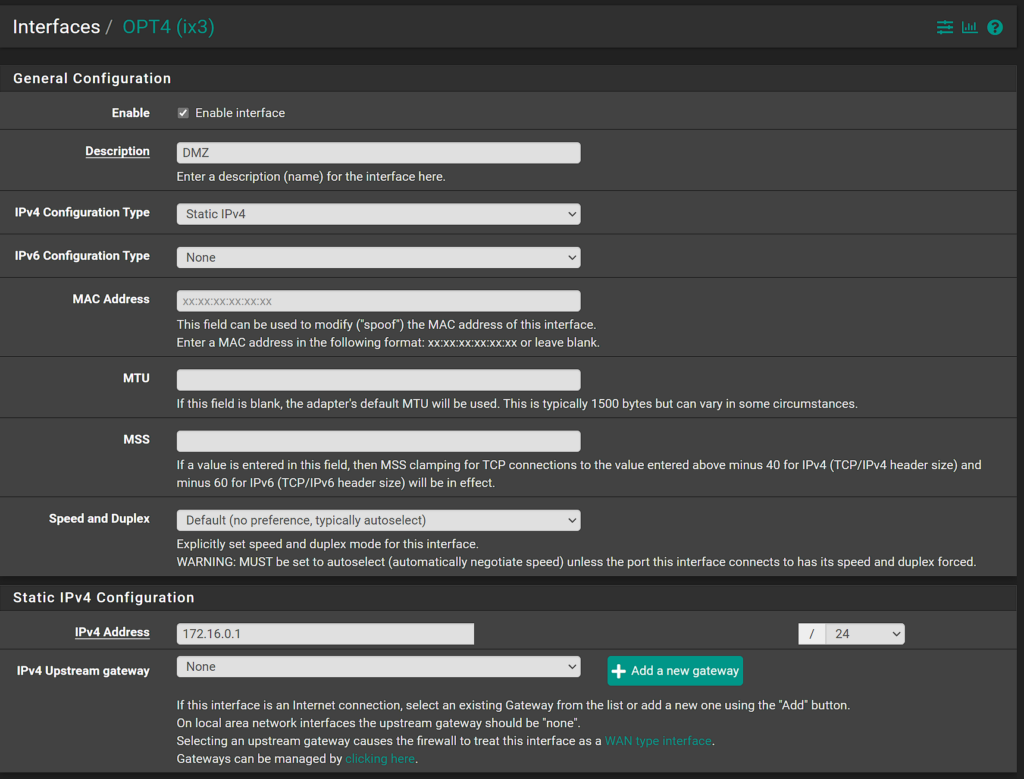
3. Change the interfaces settings to match the information below:
- Select Enable Interface.
- Set the IPv4 Configuration Type as Static IPv4.
- Set the IPv4 Address as the subnet you’d like to use, and /24.
All other settings can stay as default, then you can save.

DHCP Server – How to Set up a DMZ in pfSense
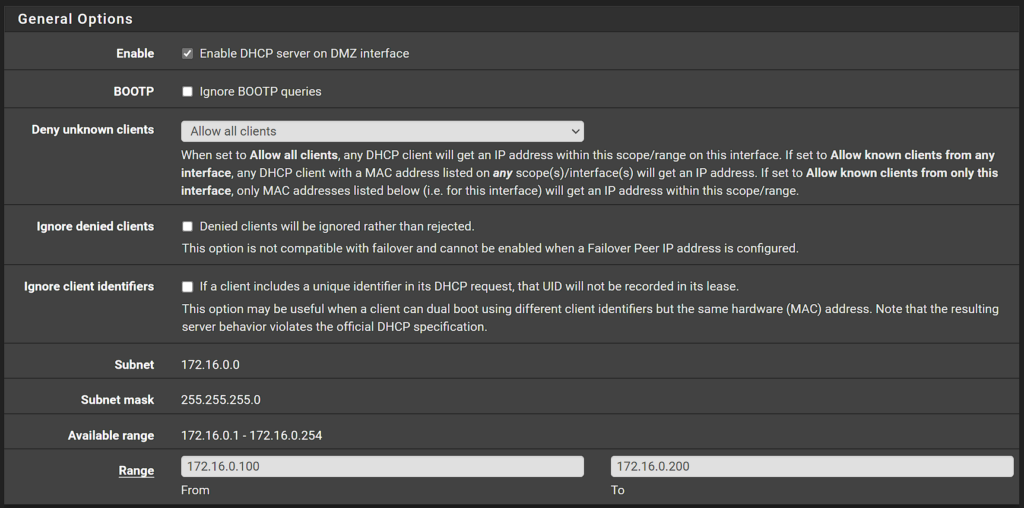
By default, the DHCP server will not be enabled on this interface. If you’d like to enable it, you can by selecting Services, then DHCP Server, then DMZ. From there, you’ll have to Enable the DHCP Server and specify the range that you’d like this interface to use.

Please keep in mind that if you’re planning on having a limited number of devices on the DMZ, it might be best to manually configure their IP settings on each client.
Firewall Rules – How to Set up a DMZ in pfSense
This is the most important section of this entire tutorial. The firewall rules that you configure will determine what the DMZ network can/cannot access. Ultimately, this section will be different for everyone as you’ll have to specify the specific ports that you’d like the DMZ to be able to access.
There isn’t necessarily a bare minimum amount of ports that should be allowed, as it really depends on the services that you’re running. For example, if you’re exposing a content management system like WordPress, you probably want to ensure that port 80 (HTTP), port 443 (HTTPS), and port 53 (DNS) are allowed so that WordPress can communicate with the internet.
However, if you’re using something else, there’s a chance that you’ll need to specify different ports. Remember that these are the ports that you want the DMZ devices to access. If you plan on using port forwarding to expose any of these services, the firewall doesn’t technically need any rules – but you probably want something allowed to ensure the devices can communicate with the internet to update, etc.
A few additional points that I want to make that will hopefully help:
- Understand how Firewall rules work in pfSense so that you understand exactly what you’re allowing.
- The DMZ network will not be able to access anything by default. However, if you create an allow any rule, the DMZ will be able to communicate with your LAN subnets, so do not do this. Instead, allow access to only the specific ports that DMZ devices need to access.
- If there are multiple DMZ devices that need to access similar ports (meaning not all DMZ devices, but some DMZ devices), you can use aliases to group the devices that need to access the same ports together.
- This contradicts the main point here and is most likely overkill, but I always specify a rule that blocks traffic to my destination LAN network (and any other important local subnets). This just ensures that if a firewall rule is inadvertently created that grants access to something it wasn’t meant to, traffic will be blocked to my LAN network regardless. You can also block the DMZ network on the LAN network’s firewall rules.
Example Firewall Rules for a DMZ Network

That’s it! As soon as the firewall rules are created and devices are utilizing the DMZ network configured above, they will be separated from your other local devices.
Conclusion: How to Set up a DMZ in pfSense
This tutorial looked at how to set up a DMZ in pfSense. Setting up a DMZ network is basically no different than setting up a VLAN in pfSense, though the firewall rules must be carefully reviewed to ensure that they’re configured properly. The benefit of having a DMZ is you’re physically separating (in a perfect world) the exposed devices on your local network from the local devices. There are many layers to security, but this is a good first step if you’re exposing services and want to ensure they cannot communicate with local devices.
Thanks for checking out the tutorial on how to set up a DMZ in pfSense. If you have any questions on how to set up a DMZ in pfSense, please leave them in the comments!


