In this tutorial, we are going to look at how to set up NordVPN on Ubuntu. NordVPN is a privacy-first VPN that is fast, has tons of different countries to connect to, and is incredibly easy to use.
I have been a user of NordVPN for close to three years and have used it in various situations to secure my connection, with a great example being public Wi-Fi. In this tutorial, we will focus on how to set up NordVPN on Ubuntu, but there are applications for almost all devices and operating systems.
This process is not for creating a VPN to connect to your local network. If you’re interested in learning about that, please follow one of our VPN tutorials.
How to Set Up NordVPN on Ubuntu
Step 1: Installing NordVPN on Ubuntu
1. Sign up for NordVPN and ensure that your account is active. Using this link, you can save 60%.
2. Run the command below to download and install NordVPN.
sh <(curl -sSf https://downloads.nordcdn.com/apps/linux/install.sh)

3. If you receive an error that the command curl cannot be found, run the command below, then repeat step two.
sudo apt install curl
4. Run the command below to grant the NordVPN user the permissions that it needs. This command will automatically used the currently logged-in user.
sudo usermod -aG nordvpn $USER

5. Reboot your device by running the reboot command below.
sudo reboot now
6. At this point, NordVPN is fully installed! We will now connect to NordVPN using the credentials you created in step one.
Step 2. Connecting to NordVPN
1. Run the command below to login to NordVPN.
nordvpn login
2. You will receive a message stating that you need to use a browser to login. Copy the URL and paste it in a web browser, then continue logging in.

3. After you’ve successfully authenticated using the webpage, run the command below to connect. You will automatically be connected to the nearest location. Please move on to step three below if you’d like to customize this command.
nordvpn connect

Step 3. Connecting to a Certain Location with NordVPN
Connecting to any NordVPN location will automatically secure your connection, but you can easily connect to other countries if you’d like.
1. Run the command below to see a list of countries where NordVPN has VPN servers.
nordvpn countries
2. Run the command below to connect to any of the countries listed in step one.
nordvpn connect [COUNTRY]

Step 4. Automatically Connecting to NordVPN on Ubuntu Boot
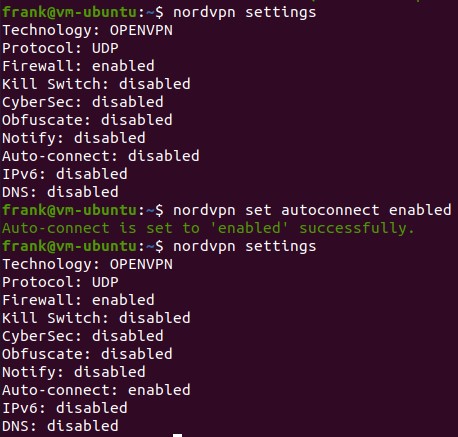
You can set up NordVPN so that it automatically connects as soon as you boot your device.
1. Run the command below to get the current NordVPN settings.
nordvpn settings
2. The command below will enable auto-connect. To be clear, after running this command, NordVPN will automatically connect as soon as your device is turned on.
nordvpn set autoconnect enabled

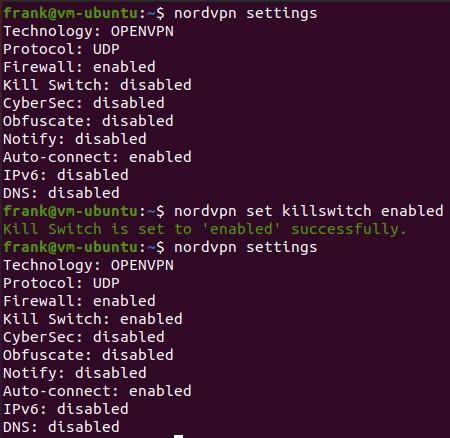
Step 5. NordVPN Kill Switch
In order to “kill” your internet connection as soon as the NordVPN connection is lost, you can run the command below to enable it. After this is enabled, if NordVPN drops the connection for any reason, the Ubuntu device will NOT be able to connect to the internet. If you want to ensure that your internet connection is always secure, this is recommended.
nordvpn set killswitch enabled

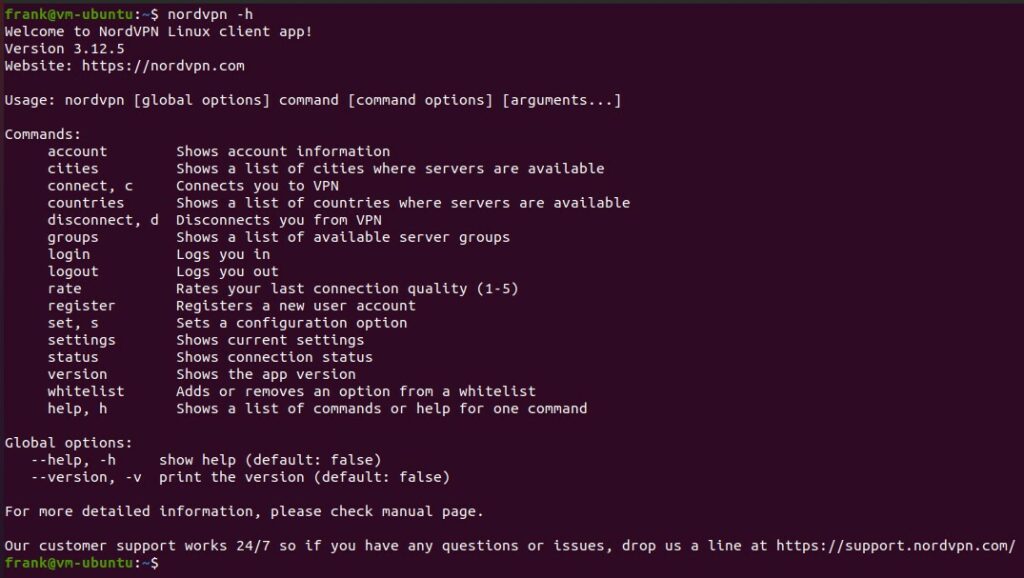
Step 6. NordVPN Help Menu
There are tons of other options that you can use and the help menu will allow you to see all of them. Run the command below to see the NordVPN help menu.
nordvpn -h

Conclusion & Final Thoughts: Configuring NordVPN
This tutorial shows how to set up NordVPN on Ubuntu. Overall, the process is fairly straightforward forward but the settings are incredibly powerful, depending on how you configure them. NordVPN can be used on all of your devices to secure your connection.
Thanks so much for checking out the tutorial on how to set up NordVPN on Ubuntu!


